How Do You Transfer Music to An iPod?
By Rachel Cericola
Dear Big Picture Big Sound,
I just got an iPod for my birthday. I must admit, however, that I am a bit technophobic and have no idea how to get started. I don't even know how to transfer music to the player! I've heard something about ripping my CDs, but they seem a little to stiff for that.
Tell me, how do you transfer music to an iPod? Can you point me in the right direction?
Thanks!
-Clueless in New York
Answer:
Happy Birthday Clueless!
Believe it or not, you don't need to be The Hulk to rip (which is just a fancy way for saying "copy") CDs. However, you will need iTunes, if you have an iPod.
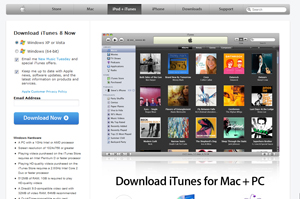
Don't worry if your iPod didn't come with a copy of the iTunes software. Most of them don't anymore. Even if you don't have an iPod, Apple wants you to use iTunes, especially when you want to purchase new music or videos, so the software is readily available and free on the web.
Start at the iTunes Web site. This is where you will download the software. First, check out the list of computer requirements (such as memory) for the iTunes software. If you have a newer computer, you probably won't worry so much about this listing. However, older machines may not have the power to store music and video files -- especially a lot of them.
Apple offers iTunes software that is compatible with both PC and Mac computers. Click to download the software, and save the file "iTunesSetup.exe." Make sure you know where you saved the file; you will need to access it.
Once the file is downloaded, double-click on its icon. This will launch the file. Click Run and follow the on-screen prompts. Soon, you will have iTunes on your computer. This is necessary to rip CDs to an iPod.
After installing the software, open up the iTunes program and hook your iPod to the computer via the included USB cable. The iTunes program will automatically recognize your device and also check for any necessary software updates.
To rip music, add one CD to your computer's disc drive. Again, iTunes will automatically recognize a new element, and ask you whether or not you want to add the entire disc to your collection, also known as your iTunes library. If you click OK, the entire disc will be ripped. That's easy enough. However, if you are like me, you may only want certain songs to make it to your portable playlist. Click no and let's take a look at how to add titles manually.
Once you click no, you will see a variety of items in the menu bar on the left-hand side of the iTunes interface. At the top, there is a listing for the library, which can include music, videos, podcasts, and other media. Underneath, there are options to purchase new content from the iTunes store. Beneath that, you will see your connected iPod, as well as the CD that is currently in your computer's drive. If you remove the iPod or that CD, those options will disappear.
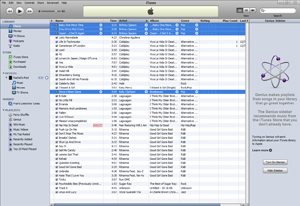
To add tracks from your loaded CD, click on the album title that is listed about half-way down that left-hand menu. You will see a listing of all of that album's song titles, which load automatically once the CD is recognized in iTunes. Click on the song title that you want, and drag it to your iTunes library, which is located at the very top of that left-hand menu. Drop the song into your library and you will see the status bar at the top stating that it is "importing" your song into the library. Once it's finished, you'll hear a small tone -- meaning you now have new music. Continue dragging and dropping tracks until you have all of the ones you want from that CD. Do not remove the CD until you hear the tone and see a small green icon next to each of the chosen tracks.
Once you get familiar with ripping individual tracks, you can try snagging a bunch of them at once. Windows users can do this by holding down the Ctrl key while clicking individual titles; Mac users will press the Command key. This will highlight each chosen title. Then when you drag and drop, it will be like one giant block of songs. It's not necessary, but can bypass the need to click and drag each individual title.
After iTunes is finished ripping your tracks, you will see them listed in your music library. You can open that listing by clicking on the word "music" under the library heading at the top of the left-hand menu. This will show all of the songs you currently have on your computer.
To put those tracks on your iPod, you will need to drag and drop them to your iPod, which is very similar to the ripping process. However, you no longer need the CD, and can remove it anytime after the ripping process has completed.
Just like ripping, you can add each title to your iPod individually or use the Ctrl (or Command) key to add multiple tracks at once. As the titles are being added to your iPod, the status bar will state it is "updating files." This is a fairly quick process. Once that has been completed, you can remove the files from your computer. However, if you don't have another copy (such as the original CD), you may want to save them. Once tracks are on your iPod, they cannot be moved from your iPod to another device or back to your computer.
Feel free to add as many songs as you like. You can always delete songs later, but most iPods have plenty of storage -- take as much as it will carry.
Here are a few additional links that might help you out:
Happy Listening!
-Rachel
Keep those cards and letters coming! if you have a question for one of our home theater experts, shoot us an e-mail to "
Ask The Expert." We'll select among these for future installments in this column. Due to the volume of requests we receive, we cannot reply to each question personally.