DIY Projector Screen - Part II - Goo It Yourself
By Adam Clem and Chris Boylan
Project #1: Goo Systems Digital Grey Screen Goo with Wood Moulding Frame
In preparation for our screen-painting project, we ordered up a liter of Screen Goo base coat and top coat in its "Digital Grey" flavor ($170 delivered, at that time), then purchased rollers, spackling compound, trays and tape, as well as wood moulding, industrial-strength Velcro and flat black paint for the frame. Total cost of all materials was around $250.
Grey? You Don't Say!
Common sense would suggest that the best color for a projection screen would be white since it should reflect all colors equally. And if you have a CRT (cathode ray tube) projector, with its correspondingly good black level reproduction, or any other projector with good color saturation but low light output, then white probably is the best choice. But more popular these days than CRT projectors (which tend to be heavy, bulky and expensive) are relatively inexpensive fixed panel digital projectors, such as LCD, DLP, LCOS, D-ILA and SXRD.
Because digital projection technologies use a high intensity bulb (which is always lit, as long as the projector is powered on) to project light through a panel, there can be some light bleed into areas of the screen that should be jet black. For this reason, most stand-alone screens as well as screen paints come in shades of grey, designed specifically to enhance the contrast of these digital projection technologies, providing deeper blacks while maintaining a neutral color balance.
As for how you choose which Goo formula is best for you, Goo Systems offers an interactive product selector which is extremely useful in helping you make the right color choice for your specific projector. You tell it what type of projector you have, how large a screen you want and what the ambient lighting conditions are, and it tells you which Goo formula you need, as well as how much of it.
Our Goo selection - Digital Grey - offers a maximum gain or "light amplification" of 1.2 directly on axis, tapering off to around 0.8 forty-five degrees off axis.
Once all the materials were compiled, Joe enlisted the assistance of resident Big Picture Big Sound artist and renaissance man, Adam Clem, who knows a thing or two about painting. And with that, the first project was underway! Take it away Adam...
Marking My Territory
As a first step, we turned the projector and cable tuner on to get a good idea of exactly what size screen we wanted. Too small and you lose dramatic impact, too large and you may find yourself moving your head back and forth to see the whole image, which can be a pain (literally). The general rule of thumb if you're watching mostly HDTV content on an HDTV-compliant projector is for your viewing distance to be around 1.5X the screen diagonal. So if your couch is 12 feet from the wall (as Joe's was), then an 8 foot diagonal screen (96 inches) is a good start (8 ft. X 1.5 = 12 feet). We settled on 98 inches.
Once size and position was determined, we kept the projector on, and marked the corners of the illuminated area with a pencil. Because of slight variations in the dimensions of images, varying according to channel, we cycled through the available stations before arriving at the largest high definition image. Once the corners of the box were marked, prep-work on the wall could begin.
Leveling the Field
Recently built or renovated wall surfaces will entail less prep-work, because they haven't been subjected to years (or decades) of poorly-applied paint and repairs. Older walls will commonly show what is known in painter's parlance as "orange-peel effect:" a heavy, rough texture caused by thick layers of rolled-on paint. Any spackle or plaster patches visible to the naked eye will register more strongly when coated with Screen Goo and illuminated by your projector. These patches must be sanded down or leveled by a scraper, and then restored with a fresh application of patching compound (a.k.a. spackle). Care must also be taken to identify structural oddities, such as shallow depressions in wallboard between the studs. The smoother and more uniform the projection plane, the better your image will be.

Before anything else could be done, I had to address the deficiencies in the wall. Most obvious was a thick, rough seam running from floor to ceiling where a large crack had been badly patched. After spreading drop-cloths to catch the debris, we used a rigid scraping blade to begin excavating the crack, working outside of the screen boundary indicated by the corner marks. Smaller patches were also removed, as were buttons of plaster lifting away from old drywall nails. I applied successive layers of wet joint compound until the excavated areas had been slightly overfilled. After allowing 24 hours for drying, I used a heavy wooden sanding block to remove the excess compound and scuff through the orange-peel paintwork. After vacuuming and a wipe-down with a tack cloth, the screen area was ready for masking and skim-coating.
Masking and PrimingUsing an 8-foot length of rigid poplar stock as a straightedge, I connected the corner marks with sweeps of a pencil. I then applied self-adhesive painter's paper tape outside the screen area, precisely along the pencil lines. This tape adheres best to glossy finishes, so it's advisable to briskly rub down the area it'll be applied to with a cloth, slightly polishing the painted surface. Once the tape was on the wall, I burnished it onto the surface with light pressure from a putty knife, to better seal the edge. To prevent the weight of the tape from pulling it from the wall, I applied strips of blue masking tape along the outer edge.
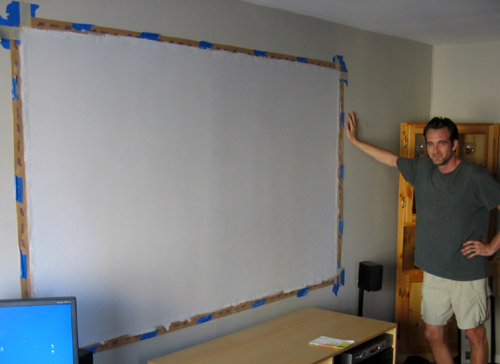
Careful application of painters tape along the marked edges of the screen border will allow you to get a nice clean edge.
Using a narrow-bladed putty knife, I applied a thin layer of joint compound to the wall, over the inner edge of the paper tape. After this had dried, I used fine grit sandpaper to reveal the edge of the masking. I then used a wide-bladed knife to apply several very thin coats of compound over the entire screen area. After a final sanding with fine-grit paper, the screen was ready for a primer coat. I used an alkyd-based primer because it, when dry, tends to have better sanding qualities than acrylic or latex primers. The primer was allowed to dry and given a light sanding to remove imperfections and fibers left by the roller cover.
Ready, Set, GooAfter one last vacuuming, I was ready to apply the ScreenGoo base coat. Because even high-quality fabric roller covers can leave fibers behind in the paint, I elected to use a high-quality foam roller cover, instead. The Screen Goo base coat was thoroughly mixed with a clean stirring stick. I was struck by just how thick this product was. This screen was made during a brutally hot Manhattan summer, and the basecoat dried almost too quickly. Slight thinning with distilled water will extend the working time in hot, dry conditions.
After the basecoat was dry, I was startled by its light-catching properties. Even the slightest variations in the wall surface were rendered instantly visible in a wash of sidelight. Since there was enough product left for the job, I applied a second layer of the basecoat. This was allowed to dry for 24 hours.
I then applied the topcoat with a fresh foam roller-cover. Having read the Screen Goo application tips at the company's Web site, I was unsurprised by the vertical stripes produced along the margins of each roller stroke. Although these remained slightly apparent after the Goo had dried, they in no way affect the performance of the screen and disappear under the projected image. After achieving a uniform coat, the Goo was allowed to dry for 48 hours. I carefully broke the sealed edges along the masking area with a hobby knife and lifted away the masking to produce a perfectly clean, hard screen edge.
In FrameI then cut the framing members from pre-primed baseboard stock. I selected this particular moulding because it was milled with a concave depression on the back that would accommodate the industrial Velcro we were using to attach it to the wall. We chose Velcro because it would allow us to mount the frame to the wall easily and securely without any visible nails. Velcro also allows you to make any adjustments to position so you can get the frame perfectly level and straight along all edges.
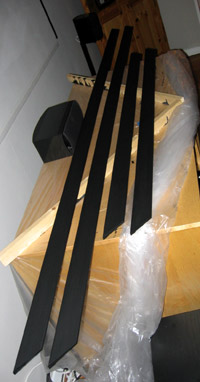
Shiver me timbers, arrr, there's the wooden moulding, matey.
I measured the screen for height and width, and those dimensions translated into the inner edge measurements of the frame. Using a simple miter box and finishing saw, I cut the frame members with 45 degree angles at the corners. Once I'd insured that the alignment was true, I primed the moulding with the same alkyd-based primer I had used on the wall, applied with a roller and smoothed with a nylon brush. After drying, each piece was rubbed down with fine steel wool to remove imperfections and roller cover fibers. Next, I applied a coat of matte black, alkyd-based paint and allowed it to dry. I then trimmed and applied the hooked Velcro backing to the back of each frame piece, pressing down into the concave trough, and burnishing it with a round-edged tool to secure the adhesive backing.
After gently sanding the moulding pieces with fine sandpaper (taking care not to expose the factory-applied white primer), I cleaned the frame pieces for their final paint job. I used matte black spray paint shot from a can. The first coat was applied in an even manner, spraying past each corner to avoid heavy buildup of the pigment. After drying, successive, light coats were misted on until the surface was a rich, velvety black without any sheen. At this point each piece was handled with latex gloves to reduce fingerprints and set aside to cure fully. While the framing was drying, I applied the woolly Velcro strips to the wall, using the hard edges of the screen as a guide.
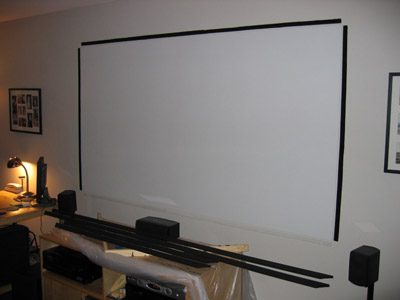
Industrial Strength Velcro works well to affix framing moulding - it's strong, adheres well, but can be adjusted as necessary to assure a level, square-edged frame.
After 24 hours, the framing was fully dried and ready for hanging. The uppermost piece was affixed first, pressing firmly along its length to ensure that the Velcro gripped evenly. The side frames were attached next and the lower piece last. I then turned on the projector and made some minor adjustments to the framing. Again, latex gloves were worn throughout to protect the powdery surface of the frame.
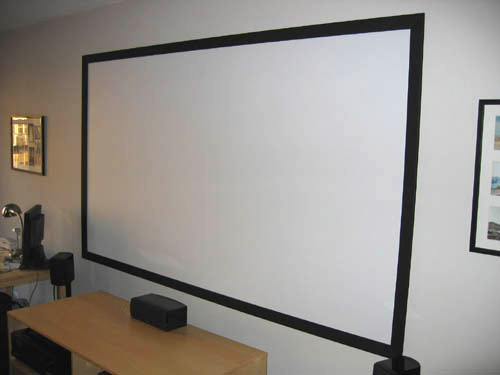
Tada!

Adam and Joe enjoy a well-deserved celebratory beverage.
Jaw Drop? Check!How did it all turn out, then? The Screen Goo system produced an image that was vastly superior to that cast on the old grey wall: greatly more luminous and detailed, with wonderful contrast and deep blacks. Color fidelity was sensational. The screen performs so well that it will reveal any limitations in the image being projected upon it: DVD's that had formerly seemed acceptable stood revealed as the terrible transfers they really were. The black frame did a great job of lending contrast and effectively neutralized spillover caused by the warped wall. As an element of the room it occupies, the screen is quite unobtrusive, thanks to the undecorated framing and shallow profile. Because of its somewhat tricky handling properties, I would recommend that Screen Goo be applied by someone well-versed in paint application techniques.

Contrast and color saturation were vastly improved after Goo-ing the wall, as this photo of the screen shows. (Movie shown: "Fifth Element" on Superbit DVD).
A recent visit to a local art museum gave me an opportunity to see a video-gallery coated with Screen Goo. Those surfaces appeared to have been sprayed, but performed no better than our austere screen painted with a roller. In my opinion, Screen Goo produces a greatly superior image that is more than worth the price, and will significantly upgrade the performance of your projector-equipped home theater at a fraction of the cost of a factory-built screen. Thanks to Screen Goo for developing such a terrific product.
No, no, no, thank YOU, Adam!
Our screen-painting adventures continue in "
DIY Projector Screen Part III" where we experiment with a lower-cost paint formulation from Behr as well as a new black cloth tape designed specifically for framing your DIY screen.
Where to Buy Screen Goo Online:
Other Articles in this Series:
Related Articles:


