How To Paint Your Home Theater: 5 Interior Painting Tips
By Dennis McLaughlin
Painting Without the 'Pain' is Just the 'Ting, Mon
If you're building a custom home theater, then you're likely going to be doing some painting. We've covered the details on how you can paint an actual
projection screen using specialized screen paint, but you also may need to do some general purpose painting of the wall and/or ceiling. I'm not going to talk about how to paint in general. That's a pretty broad topic and most people know how to do that already. What I will do is share with you five tips I use to help turn a good paint job into a great paint job. After all, your new home theater deserves nothing less.
Use The Swatch, Luke
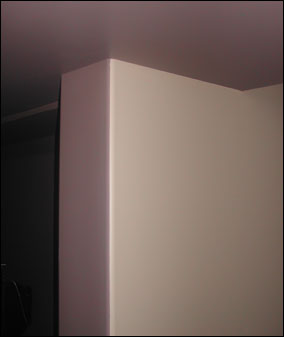
It may not be immediately apparent, but the color you choose for your home theater walls and ceiling can actually have a significant impact on your enjoyment of movies. Bright vivid colors, particularly with a glossy finish, can reflect the light from a home theater projector, minimizing the perceived contrast, and distracting you from your main focus - the screen. But painting your ceiling and walls black can make your home theater seem small and claustrophobic, not to mention a little depressing.
So what's a poor movie lover to do? Select a color for your walls that is darker than your screen, and use a flat, matte or eggshell finish to minimize reflection of ambient light and projection light. As long as your color is medium to dark, you have a pretty wide selection. Many folks report good results with reddish or maroon tones for the walls and medium to dark gray for the ceiling, but you can also go with dark green, blue or even purple. And hey, if you hate it, you can always paint it all over again!
Always Apply A Primer
What's the point painting your new theater if the walls are going to turn out ugly, right? The best thing you can do before painting your walls (but after repairing cracks and holes with plaster or spackling compound) is to first apply a primer to the painting surface. A primer coats and seals the wall helping the paint stick to it better. A single coat usually isn't enough to properly cover your wall so you'll want to apply at least two. If you don't, you'll end up with different thicknesses of primer in different places. When you paint over it, the thinner areas will still allow some of the paint to be absorbed into the drywall resulting in splotches here and there. Multiple coats of paint will not solve this so prime well from the start.
If your walls already have an older coat of paint on them, priming is still a good idea. It'll help cover up the previous color allowing your new paint to look its best. We find a gray primer works best under darker paint colors.
Use Plastic Drop-cloths
I'm not very fond of the standard canvas drop-cloths. Even the thicker canvas drop-cloths will let paint seep through to the floor below if you were to step on it. Now this doesn't matter much if the floor isn't carpeted or finished with hardwood. If the floor is carpeted, then I like using a medium-grade (4 mil or more) plastic drop-cloth.
I also like painting barefoot. The reason is because no matter how careful I am, there's always a drop or two of paint that finds its way to the floor. If I were to step on it with my bare feet, I'll feel it and I can clean it up before I track it throughout the house. If I were wearing sneakers, I'd never know it until I see paint tracks down the hallway.
Save Time And Tape
If your theater is going to have multiple colors, or you have to paint up against some trim, you can save yourself a lot of time by taping off what it is you want to protect. You can buy special painters tape that looks like blue or green masking tape. It comes in different widths, with varying degrees of adhesion (stickiness). You apply the tape to cover up the edges of whatever it is you don't want to accidentally get paint on.

An ounce of painter's tape is worth a pound of sloppy paint edges.
Once you're done painting and its had enough time to dry, gently remove the tape.
Careful use of painter's tape leads to ultra-smooth borders and edges in two-color paint jobs.
Don't use regular masking tape because its not made for this type of job. Masking tape has stronger adhesion and if the paint it's stuck too hasn't had enough time to cure (say you're painting a room with two colors), you'll rip the paint off when you remove the tape.
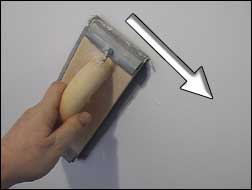
Sand Between Coats
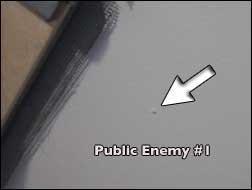
If you want really smooth walls, a good tip I'd recommend is to gently sand the walls between coats. Even if your wall was very smooth before you started painting, you can usually feel small pieces of material stuck to the wall in the paint. Fuzz from the roller, small particles of dirt that get into your paint, or using a cheap roller that splatters the paint can all cause imperfections to show up.
Once your first coat of paint is completely dry, gently run your hand across the wall in several places. You may feel the occasional very small jagged pieces of material that you could swear weren't there before. You can get rid of them by very gently running some sand paper over your entire wall. Use a hand-held sanding tool and be careful not to press too hard or you'll leave marks on the wall. With the little "jaggies" removed, apply your second coat. Once that's dry, sand any other small imperfections. You'll end up with a better paint job.
Sanding blocks are your friend.
Death to imperfections!
Buy Good Quality Rollers
Buy high quality paint rollers. Don't be afraid to pay $6.99 for two or even just one roller. Don't fall for the economy packages of 6 rollers for $9.99. Cheap rollers made of synthetic fibers typically aren't free of fuzz or stray fibers when shipped from the factory. You'll definitely have to give the roller a rub down to remove the extra fibers or they'll end up in your paint and on your wall.
I even recommend you do this with a good roller because the manufacturer doesn't always catch everything. Here's how you do it: press one end of the roller up against your belly and wrap your thumb and index finger around the roller. With a sweeping motion, pull down on the roller to remove the fuzz. This should remove any loose bits of material before you start painting, which will cut down dramatically on the debris left behind after each coat.

Removing the fuzz, Part I.
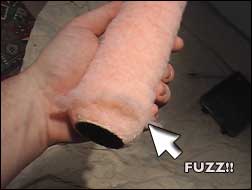
Removing the Fuzz, Part II.
Final Thoughts
Painting isn't really something you can get good at by simply reading a book. It's a skill you quickly get better at as you do it. Anyone can paint a few walls and walk away with pretty good results so don't let it spook you. The devil is in the details. My biggest piece of advice is to take your time and don't be afraid to start over if you think you have to. Good luck and have fun!
About The Author: Dennis McLaughlin is the publisher of
DIY Home Theater Design, a site dedicated to helping the handy and the not-so-handy build a great home theater on a budget.


