


The Empire Strikes Backyard
Ah, summer - when a young man's fancy turns to BBQs, beer and being outside. A slightly older man's fancy turns to the same basic things with the possible addition of watching movies in his backyard. If you're one of those cinephiles that can't be far from his (or her) movies at all times, you may wonder what it takes to setup your very own outdoor home theater. Well, your friends at Big Picture Big Sound have done just that and documented it for you.
Let's get started, shall we?
A source is a source? Of course... not!
Setting up an outdoor theater follows the same general steps as an indoor theater, with the possible additions of portability and ruggedness (i.e., you want components that are easy to move around and will withstand the elements for short periods). Before you start, you'll want to ask yourself what you'll be viewing in your outdoor theater. It's likely going to be Blu-ray Discs or DVDs, but you may also opt to stream content or even play videogames.
For our purposes, we enjoy streaming and Blu-ray Discs so we opted to get both a Roku 3 set top box and a Sony BDP-S5200 streaming Blu-ray 3D Player with Wi-Fi. We could have saved a bit of cash and just opted for the Blu-ray Player (which also has built-in streaming), but once you get hooked on the Roku's fast menus, wealth of streaming provider choices and clean simple interface, it's hard to go back to the streaming services in a Blu-ray player.
If you plan to do streaming, be sure you have a strong WiFi signal outside, wherever the source will be located, or be prepared to run a long network cable from your router outside to the components. You might consider getting a wireless repeater to extend the range of your router if the source devices are too far to get a strong signal.
The Big Picture
A couple of things you'll want to consider are the projector's brightness rating (usually measured in lumens) and its throw distance range. Brightness numbers given by manufacturers are rarely accurate but they will give you a starting point. The higher the Lumens, the brighter the projector. Look for something rated at least 1,500 Lumens for night-time use, or much higher if you intend to use it before full dark. The throw distance will determine how far away the projector needs to be from the screen in order to get the exact image size you want. Also, keep in mind that the larger the screen, the dimmer the image will get as the light is spread out over a larger surface area (like widening the beam of a flashlight). So if you want a really large image, then go for a projector with lots of Lumens.
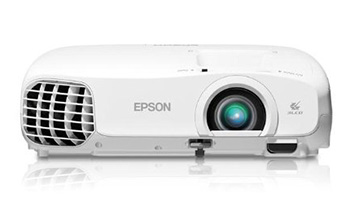
For our purposes, we went with an Epson PowerLite Home Cinema 2000 projector. This affordable projector sells for around $750 and offers full HD 1080p resolution, a fairly bright 1,800 lumen output, and even 3D capabilities using the newer universal RF 3D glasses. And its throw range places it fairly close to the screen, even with a large image. If you can afford a little more, go with its big brother, the Home Cinema 2030 which is rated at 2,000 Lumens.
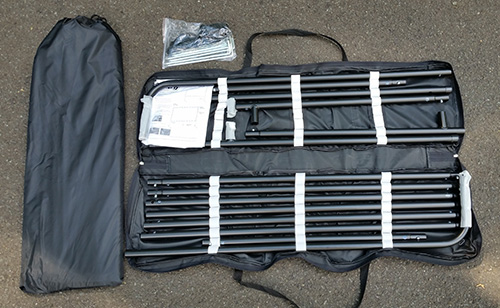
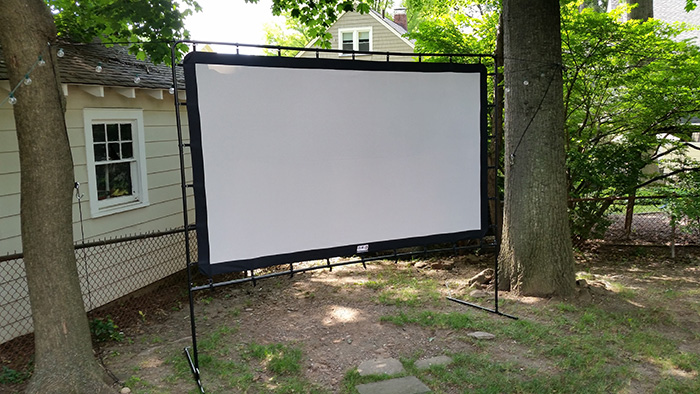
The screen is really the only item that needs to be outdoor-friendly. You can always move or cover up a projector if it starts raining, but moving a screen can be a little trickier. We went with a CampChef OS120L outdoor screen. The CampChef screen is portable and intended for outdoor use. It measure a full 10-feet from corner to corner and sets up quickly, much like a tent. It can also be broken down easily for storage after the credits roll (or at the end of the season, if you prefer) and stored in a compact portable bag.
Building the Screen
Putting the CampChef OS120L screen together is remarkably simple: it's a two-part process which feels a lot like camping. First you assemble the tubular metal frame, which features clear labels (letters) for easy assembly. The frame comes together in minutes. One tip: you may want to leave off the two feet (letter "G") since that puts the frame at an angle and makes it tougher to lay out the screen. Do the feet last.
The second step is attaching the screen itself to the frame. The instructions (which are cleverly sewn into the carrying case) recommend starting from one corner of the screen and working outwards (similar to putting a fitted sheet on a mattress). You then hold the screen taut and clip it to the frame at regular intervals. Two sides of the screen have adjustable straps attached to the clips. Do these sides last so you can expand the straps when you hook on the clips, then pull the straps tight to eliminate any wrinkles and waves in the screen. It takes a little effort, but the result is a surprisingly smooth surface.
The CampChef OS120L can be used in both front projection (projector in front of the screen) and rear projection (projector behind the screen) modes. We tried both but opted for a front projection set-up because it produced a brighter image and kept the wiring simpler with the sources and projector all easy to access from our seating position. Because we projected from the front, we kept the removable black backing cloth in place behind the screen (you remove this for rear projection implementations).
Overall, it only took a little over 10 minutes to put the screen together. Once you have it setup, you need to stand it upright and move it into place. If you're smart, this part is a two-person job. It's certainly possible to set it up alone, as I did, but moving the screen alone once it's setup is definitely not recommended (and you better hope a gust of wind doesn't come along, otherwise, we wish you "Happy Sailing!").
Location, Location, Location...
Situate the screen in your optimal viewing position and then secure it with the four ground stakes and four guy wires at the top. It helps to have the projector on for this part with a test pattern or movie running so you can confirm placement. I was a little concerned about how secure the screen would be, since my yard is at a slight downward slope, but the combination of ground stakes and guy wires feels very sturdy. (FYI: the instructions recommend never keeping the screen up in greater than 20MPH winds). Feel free to use a level to determine final adjustments to your screen placement.
As we hinted earlier, you can leave the screen set up outside - it's pretty resistant to light rain and mild wind. However the instructions advise against exposing the screen to direct sunlight for extended periods. For me, I decided to leave the frame in place but take down the screen to prevent any possible damage from wind, tree sap, sun or tiny rogue UFOs.
Once you're done with the screen, getting it all back into the case can seem a bit daunting. If the packaging falls short in any way, it's in this re-packing phase. It would have been nice to label the interior straps with letters so that you could easily tell where to put each of the pieces. In the end, it wasn't too tough to figure out (hint: you may want to take a photo of the original packaging to have a reference).
Big Sound
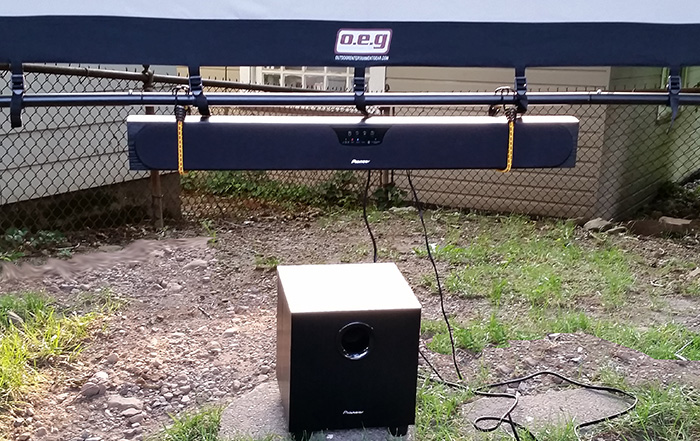
Many projectors have no speaker at all, or just a small speaker that can't possibly create a cinematic experience under ideal conditions, let alone in the great outdoors. So you're going to need something for the sound. Options include a full home theater receiver and speakers, or a simple pair of powered speakers or sound bar. For simplicity, we opted for a powered sound bar and subwoofer combination, the Pioneer SP-SB23W. If you opt for a sound bar, be sure that your projector does have a volume controlled audio output, or that the sound bar comes with its own remote control so you can adjust the volume.
If you want to go for a more permanent and weatherproof solution for the audio, consider outdoor speakers like the Definitive Technology AW-6500. Keep in mind that speakers need amplification so if your outdoor speakers do not have built-in amps, you'll need a separate amplifier or receiver (protected from the elements).

The only "set-up" required for the Pioneer sound bar was pairing the sound bar and subwoofer and running a cable from the projector's audio output to the sound bar's analog input. That was it. Initially, I was going to build a small cabinet for the soundbar and subwoofer so I could get the height just right. Then, once I saw the screen in situ, I was inspired to use that wondrous, all-purpose, Mr-fix-it tool: the bungee cord (second only to duct tape in its ability to solve all manner of problems). And, sure enough, I was able to hang the sound bar from the bottom of the screen frame. It's a surprisingly elegant look (though I'm now looking for a black bungee cord to complete the picture). If you opt for this approach, make sure your projector frame is strong enough and that your sound bar is light enough so as not to damage the frame.
"Impressive... Most Impressive"
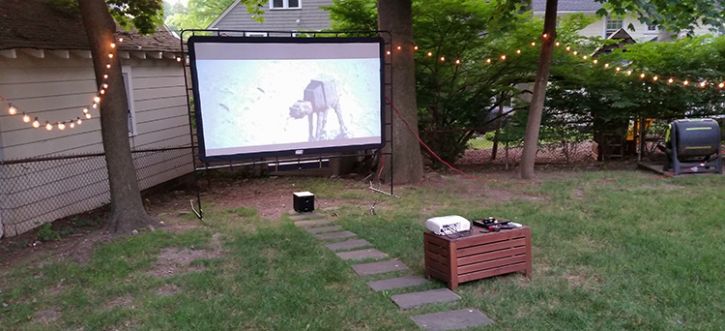
For my first trial run, I decided to use "The Empire Strikes Back" on Blu-ray Disc. You'll probably want to run your test before the sun goes down - which means the picture won't be ideal - but the light will help you to see what you're doing, so it's a toss-up.
The main obstacle here, assuming you have a projector with limited zoom range and lens shift (like the Epson Home Cinema 2000) is going to be getting the projector placement right. For our purposes, because I knew the Epson's vertical offset was just slightly above screen bottom, I used a short table (about 18 inches high) and had a few books handy so I could play with the height of the projector.
After much trial and error (it helps to have a spotter), I determined a throw distance of 12.5' for front projection and 13.5' for rear projection worked best. In both cases, the projector needed to be about 21" off the ground to avoid digital keystoning (which would rob you of picture detail). Your mileage may vary in your own environment and with a different projector.
Ladies and Getlemen, Start Your Movie
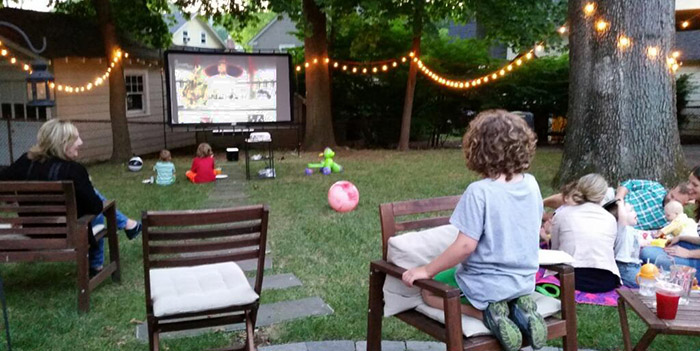
Boy oh boy, there's nothing quite like the feeling of sitting on a lawn chair in your backyard and watching one of your favorite movies in all its big picture & big sound glory. Once the sun went down (and thankfully, the mosquitos eased up), the picture was beautifully crisp. I found very little quality to be lost in the outdoor viewing experience. Very little light leaks through the screen (from houses behind the screen) and only the occasional headlights on passing cars, or the neighbor's motion sensing garage light, affected the picture.
The sound bar and sub had plenty of power. I didn't dare turn it to full volume (I know my neighbors well, but not that well). It doesn't feel like full "surround" sound, but it's plenty loud enough and dialogue comes through loud and clear ("she may not look like much, but she's got it where it counts, kid"). If you do want a full surround experience, you may be better off purchasing a full A/V receiver and running wires or using wireless speakers for the rear channels
Remote possibilities
At this point, I was juggling several remotes: projector, Roku, sound bar, Blu-ray player. It's up to you if you want to go with a universal remote. I decided against it (for now), since the soundbar volume was really all I needed once I started the movie, and even that I could adjust with the projector's remote.
One note: for front-projection, keep in mind you probably won't be able to have line-of-sight to the projector (since you'll be facing its back) though you can bounce the remote off the screen from certain angles, and you'll need to situate the source devices (in my case, Blu-ray player and Roku) toward you so you can hit them with the remote. Using rear-projection, I found I was able to get the remotes to work by just pointing them at the equipment through the screen (neat!). Other than that, you're good to go.
The Gear:
Projector: Epson PowerLite Home Cinema 2000 (around $750) - it's bright (1,800 Lumens), offers full HD 1080p resolution and can do 3D with inexpensive universal active 3D glasses. Other good choices would include the step-up Home Cinema 2030 (brighter at 2,000 Lumens) or the BenQ W1070 which is a DLP projector with slightly better black levels for about the same price. Some people are sensitive to something called the "Rainbow Effect" on single-chip DLP projectors which is why we chose the Epson (which uses LCD chips) instead of the BenQ (which uses DLP).
Screen: CampChef OS120L (around $250) - it's portable, offers a large 120-inch diagonal screen and holds up well to the elements while creating a nice bright image. Flexible design allows for front or rear projection.
Sources: Sony BDPS5200 Blu-ray Player (around $100) and Roku 3 (around $95). The Sony is a solid Blu-ray Disc/DVD player which includes 3D playback, wireless streaming capability and support for various different video file formats. For dedicated streaming, we like the Roku for its intuitive easy to use interface and breadth of streaming choices.
Sound System: Pioneer SP-SB23W Powered Sound Bar/Subwoofer combination (around $350). This system, designed by legendary speaker designer Andrew Jones, is light on gimmickry and simulated surround but heavy on sound quality and performance.
Cables and Accessories: We used two Amazon Basics HDMI cables (around $5 each) to connect the sources to the projector, plus a 25-foot 1/8" stereo to dual RCA cable ($7.49) to connect the projector's audio output to the soundbar. We also picked up four pairs of Samsung's universal 3D glasses for about $18/pair.
Total system cost, including cables and 3D glasses, on Amazon: $1,561.14 (plus tax).
The Bottom Line
As you might imagine, getting everything set up and dialed in for each viewing takes a bit of effort, so you probably won't be using this scenario every day. If you can incorporate some kind of outdoor table or stand (for the projector and source devices) into your backyard and just leave it there permanently then this can save you some setup time. Short of that, find a way to mark the place for the stand and screen locations so you won't have too much trial and error getting the distance right for each repeated movie night. In any case, it's worth a bit of effort to gather your friends and family together for a warm summer evening of outdoor Big Screen entertainment.
As a final thought: be sure to get to know your neighbors, and invite them over (if they have good taste in movies). This makes it a lot less likely they'll complain about the noise. Just be sure to order enough BBQ fixins and tasty beverages and don't forget the bug spray!
Buy Now or Check Prices/Availability:


