Datacolor SpyderTV Colorimeter and Video Calibration Software Review
By Cliff Darroch
Spyder Calibration-istic Expealodocious
I recently took delivery of a brand new Panasonic 50-inch high-def plasma, model TH-50PHD8. It cost more than my first car, and seems to impress the ladies more. Man, does it look great! Black surround, astounding High Definition picture, and in my smallish family room setting, a picture size reminiscent of a small movie theater. I think for a lot of us who have made the jump in to a more modern, and more expensive, viewing experience, we find ourselves wondering whether or not we are getting the most from our investment.
Bringing the theater into our homes, we have avoided the logistical problems of getting out for a movie. We have also found a way to rid ourselves of the annoying patrons who spent $12 just to kick the back of our seat, or carry on a full discussion analyzing the plot line to a comedy. A line from a recent movie I saw summed it up perfectly, "There is a special place in Hell for child molesters, and people who talk during the movie."
On the flip side though, watching movies at home requires that we assume responsibility for the picture, the sound, and the popcorn. The popcorn is easy - press a button on the microwave and come back when it beeps. Setting up the sound is also getting simpler: many recently released home theater receivers have advanced to the point that one can install the source and receiver, position the speakers, connect the wires, and then drop a microphone in the listening position, and sit back and relax. The auto-calibrating receiver will adjust the speaker levels, crossovers and distance settings to give the home theater owner a pretty accurate surround sound experience.
But what about the picture part? How do we get the best picture out of the display itself? Any videophile worth his salt knows that the factory settings on most HDTVs are adjusted so that they look nice and vivid on the brightly lit showroom floor. But these settings look less than ideal in the subdued lighting environment of the home. My Panasonic plasma offers a number of picture presets, and an array of additional adjustments which really are intended for the video professional to use (the panel is part of Panasonic's industrial line), and adjusting these can help. But I find myself wondering if I'm getting the best picture I can. What is out there to help?
Simple Video Calibration... The Final Frontier
After doing some investigation, I found that there were three possible options which could help; First, there is the ISF (Imaging Sciences Foundation). This organization certifies technicians which can come to your premises and calibrate your display using the service menus built in to most display devices. These service menus are not for the faint-hearted and if used inappropriately, can completely mess up an otherwise functional display.
The second option is to use one of the available DVD-based home theater calibration tools (Avia, Home Theater Essentials etc.). These provide a number of calibration screens and patterns which you look at and compare to examples and adjust the display accordingly. This is an interesting and reasonably personalized way of calibrating your display. Unfortunately, it doesn't work for me because my eyesight is in different states depending on the day, my stress levels, or whether I cleaned my glasses.
The third method is to use a colorimeter; a device which reads the intensity of color using an electronic eye. It then compares the color values it reads to a set of standards and recommends changes accordingly. Colorimetry has been used for years in the printing industry to ensure that the color which is reproduced meets the client's exact specification. This is one of the tools used by the ISF professional, and until recently, has been prohibitively expensive, and overly complex to use. Until now.
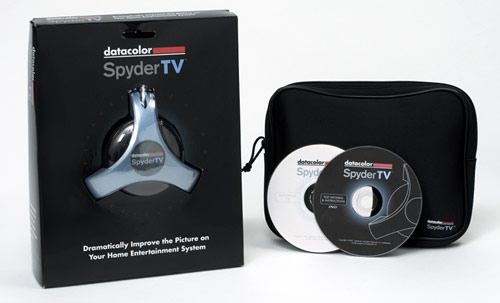
The SpyderTV package comes complete with colorimeter, software CDs and a convenient carrying case so you can take your calibration skills on the road.
A leader in color measurement industry,
datacolor has introduced a consumer accessible colorimeter and calibration software package which works in conjunction with your personal computer or laptop. The
SpyderTV (which is a play on the unit's design) is a combination of colorimeter, analytic software and standard test patterns. By playing the test patterns on your DVD player through the connection of your choice (HDMI, DVI, component, etc.), and measuring the image with the colorimeter, the analytic software suggests changes to your major adjustment options; Brightness, Contrast, Color and Tint.
Unlike the ISF method of digging into service menus which are specific to each display type (and can do more damage than good if used inappropriately), the SpyderTV uses adjustments which are available on every display. They can be adjusted and reset if necessary, and can be saved as user definable settings on most newer displays.
The Set-Up
Set-up of the unit was simple and painless. All of the necessary components were included in the package and I was able to get up and running in less than 10 minutes. I started by installing the SpyderTV software on my laptop. Then the SpyderTV colorimeter is mounted flush to the display surface, in the center of the display. There are two methods of accomplishing this, suction cup (included in the package) and tripod mount. The SpyderTV has brass mounting points for a standard photographic tripod. Once the SpyderTV is in place, a counterweight is adjusted to provide the best counterbalance for each method. Finally the SpyderTV is connected to the laptop or PC via a USB cable. Three easy steps and the set-up is done.
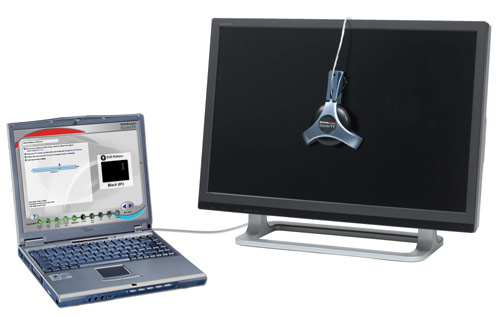
The SpyderTV colorimeter attaches to your display with suction cups, and to your laptop via a USB cable.
The Process
The process is simple! Follow the steps described by the software and in 20-30 minutes you'll be done. I started by following the prompts by the analytic software. I was prompted to insert the DVD containing the test patterns and colors into my DVD player and start at a specific chapter. I then was prompted for information about my display. which type (Plasma, CRT, LCD, etc), what brand, model and location. The latter information was used to create a categorization for the results report. This was a great feature, as I was able to calibrate a number of different displays for myself and friends. The next information which I had to supply was the bounds or range for each of the adjustment types for my display.
For me these ranges of settings were:
° Color Temp: Cool, Normal, Warm
° Picture (Contrast): -30 to +30
° Brightness: -30 to +30
° Color: -30 to +30
° Tint: -30 to +30
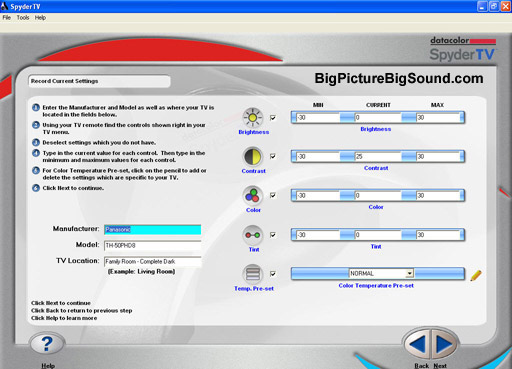
The SpyderTV software include an intuitive, easy-to-use graphical interface to help you through the complexities of calibration.
I was then prompted to move through a series of two patterns (Patterns 1 & 2), adjusting the Picture value and the Color Temp value, to determine the optimal settings for both. The procedure repeated for Brightness using the same two patterns. Moving between the patterns was as simple as using the chapter forward and back buttons on the DVD player remote. The next two patterns (Patterns 3 & 4) were used to determine optimal color settings and two final patterns (Patterns 5 & 6) were used to set the Tint
Once a set of recommendations was made, additional test patterns for black, grey, grids were available to check the results. Also images which were comprised of skin tones, shades of white and grey as well as a black panther were provided so you could do "before" and "after" comparisons.
And after the process was complete, the SpyderTV software presented me with a report containing graphs and charts for all of the tests. Super-Geeky! And by that I mean "Very Cool!"
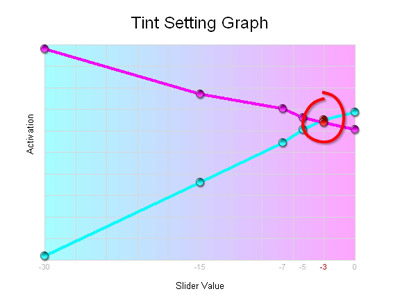
SpyderTV generates a detailed PDF-format report complete with charts for all of the various picture settings.
The Results
Needless to say, like all know-it-all technology geeks, the first time I calibrated the set I took the suggestions on ambient light levels as more of a guideline than a hard and fast rule. I also tried to complete the task in record time, and forgot to make sure that the only image on the display was that of the test pattern, and not the onscreen menu as well. So after following the process, I was given the following combination as the optimal settings;
Color Temp : Warm, Picture : -16, Brightness : 0, Color : 26, Tint : -11
The exhibits used for comparison were quite interesting after I made the adjustments. The skin tone exhibit seem a little on the warm (Red) side of normal to me, but based on my eyesight, I wasn't going to ask many questions. The exhibit for whites and greys looked very good, but again the skin tones on the models seemed just a little to red to me. The final exhibit of the panther was outstanding. The tonality of the fur, the subtle detail in the shadows was fantastic.
I was happy with the results, assuming that what was recommended was the best it could be, until I switched back to the satellite feed I use for regular TV and HDTV. Wow, was the image hot! Looking at the setting on the onscreen menu, a Color setting of -11 was clearly in the red. So I thought something must be wrong. Clearly the picture was bad on the TV images, but I calibrated using images from the DVD input, maybe that was how it was going to be, one setting for DVD, and a different setting for TV/HDTV? I was expecting minor differences, but nothing major, and I still wasn't convinced that the warm on the DVD side was accurate.
I decided that a second calibration would be necessary in order to put my questions to rest. Also I needed to find out whether an immediate visit to my optometrist was in order. This time I started with a completely dark room, blinds closed and no sources of ambient light. I also committed the time to do this right, allowing the image to come to rest after each change, removing the onscreen menu before each measurement was taken. The entire process still only took 25 minutes, so I guess haste can indeed create waste.
This time the procedure produce a suggested setting as follows:
Color Temp : Warm, Picture : -16, Brightness : 1, Color : 0, Tint : 3
What a difference! The skin tone exhibit was rich and natural without the overly warm appearance. The grey and white exhibit took on a crispness that just wasn't there before. The panther exhibit still had the subtleties, tonality and details of the other settings, but this time the facial features seemed to pop from the screen.
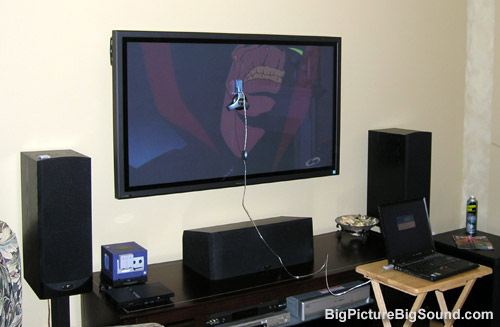
Datacolor's SpyderTV in action on Cliff's Panasonic plasma.
I guess hindsight says that even with a tool, proper care must be taken to create an environment that best suits the calibration, and commit the time, you'll be better for it.
Final Thoughts...
The SpyderTV is a very easy tool to use. Follow the menus, take care of the pre-requisites (especially the one about the total darkness) and you will find that you get a display that is more detailed, produces more natural color, and provides the best black level it is capable of. It will not fix geometry, moiré, or any of the other physical issues which can be associated with CRT's or other technologies. It won't be able to provide new-found levels of contrast on an LCD RPTV, but it will make sure that it is set to provide the most detailed blacks and natural colors that it can.
Would I recommend purchasing a SpyderTV? Yes, if you can justify the expense (buying it to calibrate a $300 TV might be overkill). The device works as advertised, a claim which is hit-and-miss in the world of accessories today. If you have just invested in an expensive display, and want to tweak it to its maximum potential, this is an easy way to get it right. A DVD-based solution like Avia, costs a fraction of the price, but for me just couldn't deliver the same results. An ISF technician, in my area, would be almost twice the cost, and I'm not sure that on my plasma, the potential incremental refinement is worth the additional investment.
In today's home theater market, is an investment of $249 to achieve the most out of a display, really out of line? The decision is ultimately yours, but to add some perspective, a comprehensive remote control costs around $200, a good set of interconnects cost $100, the mount for my plasma was $300, so for me, $249 to make the plasma sing is right in my sweet spot.
In the Box:- 1 SpyderTV software CD
- 1 SpyderTV colorimeter
- 1 Suction cup/tripod attachment
- 1 SpyderTV test pattern and Instructions DVD
- 1 Storage Bag
- 2 year SpyderTV hardware warranty
- Free technical support
- Free software updates
Where to Buy:Manufacturer's Contact Information:
ColorVision, Inc.
5 Princess Road
Lawrenceville, NJ 08648
USA
Tel: 609.895.7430 / 800.554.8688
Fax: 609.895.8110
Web sites:
www.colorvision.com,
www.datacolor.com.


