Perhaps the most difficult chore in getting the best sound out of a home theater system is getting your subwoofer properly integrated with your main speaker system. Whether you're installing a $500 home theater in a box, or a $50,000 component system, the same basic principles apply to subwoofer configuration and installation.
This primer covers the basics of subwoofer set-up so you can get the most out of your home theater loudspeaker investment. So plug your receiver or processor's subwoofer line output into the subwoofer's line input (RCA type jack), power up the subwoofer and let's get started.
Tools required:
Controls on the subwoofer (not all of these are present on all models):

Controls on the receiver or processor in the set-up menu (not all controls are present on all models):
Protect Your Ears!
What good is good bass if you can't hear it? Safe subwoofer set-up means using earplugs for the loud parts. I know it may seem counterintuitive to set up an audio device without the use of your ears, but this is only required for the parts of the set-up that use the SPL meter. Good subwoofers can reproduce sound in the lowest audible octave - 20 to 40 Hz - and while you may not notice the sound pressure audibly, it still can lead to listener fatigue and even damage your hearing if it's played at excessive levels.
Plus when you're experimenting with proper phase adjustment, using descending bass warble tones, you may experience lower pressure levels in the 40 Hz to 100 Hz range (due to phase cancellation), but then extremely high SPLs in the deepest bass. So be safe: when in doubt, put in the plugs and make sure children, spouses, pets and helpers are also wearing earplugs or are out of the house. As for getting your cat to wear earplugs, well, you're on your own there.
What's the Frequency, Kenneth?
Simply speaking, a crossover frequency is the point where one speaker drops off in output and another takes over. Large tower speakers may be capable of putting out bass as low as 40 or 50 Hz, while small satellite speakers may give up the bass ghost at 80, 100, or even 120 Hz. As important as finding the best location for your subwoofer is finding the best crossover frequency (or frequencies) to use to mate the subwoofer with your main speakers. If your main speakers are all identical, from a matched system, then this is generally simpler because the crossover setting will be the same for all speakers. But if your system combines different brands or different sized speakers, then finding the best crossover settings can be tricky.
If your home theater receiver or processor allows you to adjust the crossover settings independently for your speakers, then generally speaking, you should use the crossover settings in your receiver or processor and set the subwoofer's own "crossover bypass" control to "bypass" (assuming it has one).
How Low Can You Go?
To find the ideal crossover frequency for your speakers, you'll need to identify how low your main speakers can go with usable bass output. Generally this means you want to find your speakers' "-3 dB" point. By checking your speaker manual or the manufacturer's Web site, you should be able to find this point. If you see that your speakers' rated frequency response is "50 Hz to 20,000 Hz +/- 3 dB" then this means your -3dB point is probably around 50 Hz and this is where you should set your crossover. Keep in mind that some manufacturers are a bit generous with their rated specs, so use the rated frequency response as a starting point as you begin detailed calibration.
If you can't find the rated frequency response, or are looking for general guidelines, consider the following chart:
| Speaker Size/Description |
Crossover |
|
Tower speaker with one woofer 10 inches or larger, or two woofers 8 inches or larger |
40 Hz |
|
Small tower or large bookshelf speaker with one 8-inch or two 6-inch woofers |
60 Hz |
|
Bookshelf speaker with one 6-inch or two 5-inch woofers |
80 Hz |
|
Bookshelf speaker with one 5-inch or two 4-inch woofers |
100 Hz |
|
Satellite speaker with one 4-inch woofer (or smaller) |
120 Hz |
The above can be used as a general rule of thumb, or a starting point from which to begin the actual measurements.
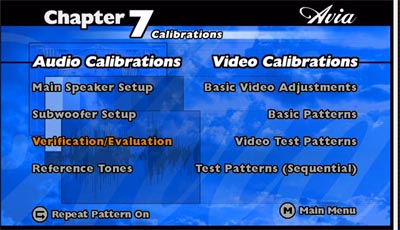
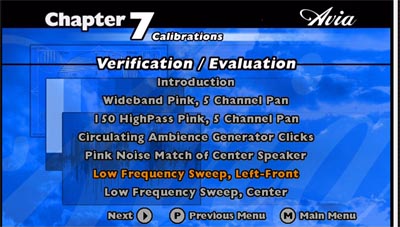
To find out the real -3dB point of your speakers in your room, you can do that with your SPL meter and the Avia test disc. For this test, put in your earplugs, turn off the subwoofer and get into your receiver or processor's set-up menu. Find the "speaker configuration" set-up and specify the "large" setting for all speakers. Also, find the subwoofer setting in this menu, and make sure it is set to OFF (yes, that's right - "OFF" - you will turn it back on later). Now you'll need a low frequency sweep for all of your channels. On the Avia disc, this is in "Advanced Avia" (Chapter 7). Select "Verification/Evaluation" then select the "Low Frequency Sweep" tones beginning with the Left Front and cycling through all 5 of the main channels (see screenshots below).
Set the volume of your receiver or preamp to a loud enough point that the tones register on your SPL meter with the setting at "70" or "80" dB, with "C" weighting and "Slow" response. Point your SPL meter to the ceiling holding it as close as possible to where your ears would be in the "sweet spot" - your normal listening position. As the bass warble tones descend, eventually you're going to see the SPL meter drop off significantly somewhere between 20 Hz and 120 Hz. When you see this happen, look at your TV screen to see what frequency this is occurring at. Write that down for each speaker (Front LR, center and surrounds), as these will be the crossover settings in your receiver or processor's speaker configuration menu. If your receiver or processor does not have customizable crossover settings for each set of speakers (many have only one setting), then take the highest frequency you wrote down from this test and use that frequency as a starting point.
To Treat or not to Treat?
Chances are pretty good that your listening room or home theater is comprised of parallel walls, which look all geometrically pleasing to the eye, but are anathema to good sound, particularly good bass response. Bass frequencies love to bounce off parallel walls and back into each other which, depending on the length of the room and the length of the sound wave, can either cause standing waves (room modes), bass nulls or both - none of which is ideal. One indicates an excess of a specific bass frequency, the other a shortage of it. One way to treat this (short of tearing down the wall, as Pink Floyd recommends) is to apply sound-absorptive room treatments to your walls, particularly in the corners where bass frequencies tend to become magnified. Room treatments can prevent the bass soundwaves from bouncing back and forth, thereby minimizing room modes and nulls.
There are many manufacturers of sound panels and "traps," plus some home-made approaches which can have varying degrees of success. If you are unable to get a smooth frequency response from your subwoofer then you may consider applying these room treatments to the walls and or ceilings of your listening room. Try not to spend more on the room treatments than you did on your entire speaker system (some of the tweaky ones are not cheap)!
Getting Down to Business
OK, assuming you've identified your best guess for the crossover setting, now it's time to get down to the real business of calibration and positioning. First, get back into your receiver or processor's speaker setup menu, and select "Small" for all speakers - this enables the receiver or processor's crossover controls and bass management. Turn the subwoofer back to "On" (both in the menu, and the switch on the subwoofer itself) and set the crossover frequency or frequencies to the levels you wrote down in the previous step. Now get out some music or movie tracks with which you're familiar, set the volume control of the subwoofer to a level that blends well with the main speakers and let's find a good place for the subwoofer to live.
Location, Location, Location
Proper placement of a subwoofer within the listening room can make or break a home theater. Differences in placement of a few feet, or even a few inches can have a huge impact on sound quality. Unfortunately in many rooms, placement choices are limited - maybe you have a small room without much available floor space, or maybe you don't want to have visible wires on the floor - but if you get creative, you should be able to find a good location for your sub. Many subwoofers actually make passable end tables, and hey, you have to put your drink down somewhere.
As a general rule, placing a subwoofer close to a wall (or in a corner, close to two walls) will give you more bass, but it won't necessarily give you the best bass. The walls reinforce the bass output, but they can also emphasize certain mid-bass frequencies, so they can add a bit of "boominess" to the bass. If you're working with a relatively small subwoofer (10 inch driver or smaller), sometimes corner placement sounds best as it can extend the usable output by a few Hertz, giving you a more solid low end. But larger subwoofers usually do not need the extra oomph of a corner and will usually do better 6 to 12 inches from a single wall. Also, in general, although low bass frequencies are non-directional, it is a good idea to place your subwoofer within the front half of the room, not too far from your main speakers so you can avoid time delays and help minimize phase cancellation problems.
Be the subwoofer, Danny
The usual trick in finding a good starting point for your subwoofer's location is to put the subwoofer where you would normally sit and then move around the room until the bass sounds not only loud but smooth (evenly distributed in its frequency response). If you're very patient, you can put on those same bass frequency sweeps (described earlier) and move around the room with your SPL meter looking for the place that has the most even response. But you can always do the detailed calibration later. Once you find a likely candidate location, move the subwoofer to that position then plop yourself back in the sweet spot to begin the final calibration.
Now it's time to break out those test tones again on the Avia test disc. Choose the same series of tones described above (Low Frequency Sweep) which descend from 200 Hz down to 20 Hz. Set your SPL meter to "C" weighting and "Slow" response, put your earplugs in, and crank up the volume high enough on your receiver so that the 200 Hz tone reads somewhere between -2 and +2 on the SPL meter, set to either the 70 or 80 dB setting.
As the bass frequency descends, note the readout on your SPL meter. You should see only small variations in the SPL output through the entire bass frequency range. Large variations in level mean something is amiss in subwoofer design or set-up. Does the SPL dip significantly at 80 Hz only to rise again at 60? This may indicate that you've set the crossover frequency too low and neither the subwoofer nor the main speakers are putting out enough sound in that frequency range. In this case, raise the crossover setting and repeat the tones. Do you see a huge peak in bass response at 100 Hz? This could be a sign that the crossover is too high and both the subwoofer and main speakers are putting out bass in that frequency, creating excessive bass. In this case, lower the crossover frequency, repeat the test tones and see if there is an improvement. It could also mean that you forgot to set the crossover bypass switch on the subwoofer itself. Remember, you can use either the crossover control on the subwoofer, or the one built into the receiver or processor's set-up menu, but not both.
Peaks and troughs in response at specific frequencies can be a sign of phase interaction between the main speakers and subwoofer, or room modes and standing waves that may be exacerbated due to subwoofer location. Phase interaction usually causes a drop or "suck-out" in bass frequencies near the crossover frequency where the main speakers and subwoofer overlap in output. If you see this behavior, then try flipping the subwoofer phase setting from 0 degrees to 180 degrees and measure the bass output in both settings. There is no "right" phase setting - use whichever setting delivers the best measurements and the fullest, richest bass quality. If you still have unexplained peaks or dips in the response at specific frequencies, then try moving the subwoofer six inches in any direction, repeat the frequency tests, and note the results.
Aim High, But Don't Expect Perfection
You may find after all your tinkering, that you still have some peaks and/or dips in bass performance. This is not ideal, but it is to be expected. Bass frequencies are the most difficult to control and predict, and the most difficult to get right, particularly in affordable speaker systems. A compact $500 "home theater in a box" just isn't going to get really low bass. But even more high-end systems can be plagued with uneven low frequency response, despite the best intentions of their owners. In these cases, room treatments (discussed above) can help tremendously in taming a problematic room. But some folks do not particularly like having odd-looking panels hanging about the room.
Another advanced technique is to make use of one or more parametric equalizers (EQs) which can give you access to specific bass frequencies so you can directly compensate for specific peaks or dips in the frequency response. These add-on devices typically go in between the receiver or preamp and the powered subwoofer(s) and offer a great deal of control to the advanced user.
Because phase interaction, bass modes and standing waves create different frequency responses in different parts of the room, you may find you have ideal sound in the sweet spot, but excessive (or too little) bass in other listening positions. This is also normal, particularly for a single-subwoofer system. You may actually need to compromise by adjusting the bass to be a little less-than-perfect in the primary listening position, so that you still get decent response in the other listening positions.
One method of overcoming this uneven quality of bass in different parts of the room is to actually use multiple subwoofers (2 to 4). Because each sub interacts with the room differently, each can compensate for the others, allowing you to get a smooth response virtually anywhere in the room.
There have been many studies, opinions and white papers written on the subject, including one by Todd Welti of Harman International. Welti suggests that the ideal number of subwoofers for a normally shaped room with parallel walls would be four, placed at the midpoint of each wall, or in each corner. Todd also suggests that you can get results that are almost as good with two subwoofers, placed at the midpoints of the front and rear wall. Your mileage may vary, of course and the specifics of your room might not match Todd's theoretical ideals. But the multi-subwoofer approach is valid for those with the resources, the time to experiment, and the unquenchable lust for "Mo Better Bass!"
Last Step - Kick Back and Enjoy the BIG SOUND!
After all these boring and repetitive test tones and minute adjustments, the best thing to do is take a break, go for a walk, and come back a while later to listen to some of your favorite music and movies. I've listed a few of my favorite DVDs for putting your bass to the test, but you may have your own. If the subwoofer is set up well, you'll discover elements of movies and music you've never noticed before and it will just "feel" right. In fact, that's the best sign of a well set up subwoofer - it is felt, but not heard. If you close your eyes, you shouldn't be able to tell exactly where the subwoofer is located, but if someone turns it off, you'll certainly notice its absence!
When you start listening to familiar tracks, don't be afraid to make some adjustments to level and placement. After all, it's all about your enjoyment, not about the readout on some electronic meter. You may even find you prefer different level settings for movies vs. music. Feel free to tweak and adjust as you like. Just note the original settings so you can always get back to where you started.
With a little effort, the right tools, and some patience you can squeeze every last drop out of your subwoofer and make your bass the envy of your neighborhood.
A few of my favorite DVDs for bass:
Other Resources: