DIY Projector Screens - Part III - Let's Flok
By Chris Boylan
Project #2: Behr SilverScreen with Screen Flok Frame
Over the course of the following few weeks after our first screen painting adventure, we had the opportunity to oversee two more front projection installations with painted wall screens, one using ScreenGoo's "Digital Grey Lite" formulation, and one using a fairly popular lower cost alternative, Behr's "SilverScreen" color (Color Chip: 770E-2). Also, we discovered a new tape-based framing product produced by ScreenGoo's U.S. distributor, Visual Reality. Their framing tape, called "Flok" (what is with these names?) promised a simpler framing solution than paint-on frames or moulding-based frames.
We selected Behr SilverScreen paint for the second project due to its wide availability (you can get it at Home Depot), low cost and reports of its suitability from many fellow members of the AVSForum. We also purchased a 25 foot roll of Screen Flok for the border as well as paint rollers, spackling putty, putty knives, trays, sanding sponges, painter's tape and other supplies. Total cost of materials was approximately $160.00.
Based on screen throw, viewing distances (11 feet to primary viewing position, 20 feet to secondary), wall size and owner's preference, we ended up with a 97 inch screen diagonal measurement.
As with the earlier ScreenGoo project, the surface preparation proved to be the most time consuming part, with multiple applications of spackling compound and sanding to get the wall as close to a smooth defect-free surface as possible. We then applied an oil-based primer (2 coats), followed by Behr SilverScreen, which is a very light gray.
We initially tried using a semi-gloss version of the SilverScreen paint, but this level of shine highlighted the minor flaws that still remained in the wall after surface preparation, and it also reflected room lighting in a very distracting manner. So we scrapped that, over-painted a new layer of primer and repainted the screen with a matte formulation of SilverScreen instead which proved much more suitable for the task at hand.
The SilverScreen paint was a definite improvement over the previous off-white wall, but the real star of this show was the Visual Reality Screen Flok which provided a neat non-reflective black frame around the edges of the screen and was nearly as easy to apply as masking tape. The cost is relatively steep for a roll of tape ($39.99 plus shipping for a 25 foot by 2 inch roll), but the savings in labor time when compared to painting the frame or assembling it out of moulding more than made up for the cost. Plus the dense pile structure of the tape surface completely absorbs any stray light along the edges of the screen.

Behr SilverScreen paint worked well with our LCD projector, but perhaps not as well as the Goo stuff.
As with the earlier project, the improvements noted before and after painting the screen were very noticeable - better perceived contrast, more vivid colors and enhanced detail. However, the Behr SilverScreen paint did not quite have the "punch" of the ScreenGoo. Colors were slightly less vivid, compared to the ScreenGoo Digital Grey application and details were slighty diffuse. The projector in each case was a Sanyo 720P 3-chip LCD projector, so we feel pretty comfortable saying we preferred the Goo over the Behr. Your mileage may vary of course.
Project #3: Flok + Goo = Big Screen Nirvana
In our most recent installation, we paired up the latest Sanyo 3-chip LCD projector (the
PLV-Z4) with a newer formulation of Screen Goo called "Digital Grey Lite." This is an ever-so-slightly lighter grey than Digital Grey with a higher gain (up to 1.4 on-axis) that allowed us to get a slightly brighter, punchier picture than the earlier projects, even at a slightly larger screen size (99 inches diagonal).
And though this paint color will not allow you to watch your front projector in a brightly lit room with any kind of picture detail, it does allow you to enjoy your huge screen projected image with some ambient lighting in the room. For our screen size, we were able to get away with the smallest jar of Screen Goo - 500 ml - which made it through two coats with only a few drops to spare.
We also painted the area of wall outside the screen in a matte finish dark rust color, which helped minimize light reflection on the walls during projector viewing. This further enhanced the perceived contrast of the image. For a border, we again used Visual Reality's Screen Flok, in a 25 foot x 2 inch roll. Total cost of materials for the project was approximately $240.
The combination of Goo Digital Grey Lite and Flok tape proved to be the most effective combination overall at reproducing a high quality image with our LCD projector, as well as being the simplest to install. We found it easiest to apply the Flok tape border with the projector on (with a fixed blue screen) so we could make sure we were getting a perfectly straight line all around the screen.
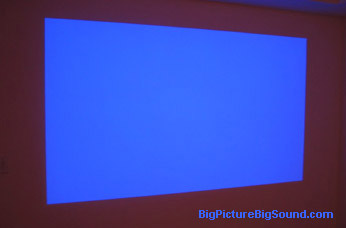
The blue "no input" screen on our Sanyo projector provided the outline for marking the screen area on the wall.
It's best to press lightly on the Flok tape until you're sure it's positioned perfectly, then apply pressure along its full length to assure that it is firmly stuck to the wall. Once affixed, the Flok sticks aggressively so make any adjustments before doing the final press.
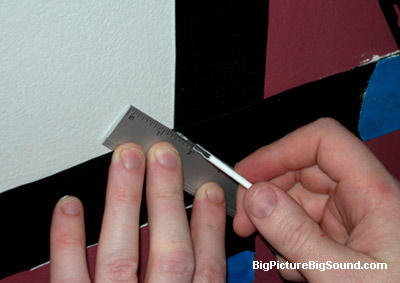
Using a razor knife and metal ruler as a straightedge, it's easy to cut a perfect corner angle in the Flok border.
Per Visual Reality's installation guide, to get nice clean corners, we cut the Flok about 6 to 8 inches longer than needed, leaving some overlap on each end of the 4 lengths of Flok. We also left the protective backing on the Flok tape for these last few inches and temporarily secured the ends of the Flok to the wall using painter's tape. This allowed us to place a straightedge (we used a metal ruler) along each corner and, pressing firmly with a razor blade box cutter, cut a perfect 45 degree angle through both adjoining strips. Then we simply removed the backing and the excess tape pieces, pressed down on the tape and voila - a perfect corner (actually, four of them).
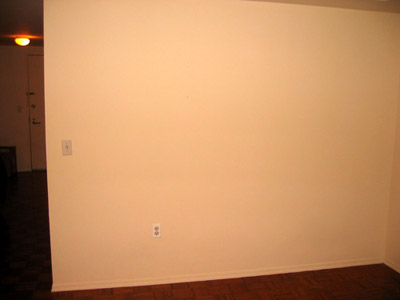
The wall before Goo-ing and Flok-ing...
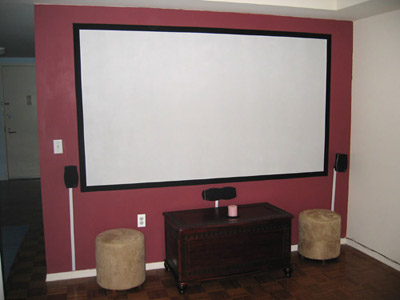
and after.
Go Flok Yourself and Get Gooey with it
As you can see, there's more than one way to paint and frame a projection screen. Goo Systems recommends spraying the screen paint onto the wall for best results but we attained perfectly acceptable results using rollers.
Many DIY screen painters choose to paint their screens on movable substrates, such as different kinds of sheetrock or Gator Board, purchased as sheets from a local Home Depot or hardware store. This makes your screen easier to remove and transport, and it eliminates the need for a lot of repairs and surface preparation since you're painting on a brand new perfectly flat surface. But it also leads to slightly more complex installation - you'll need to securely affix your screen to the wall instead of the wall actually becoming your screen, and you'll need to cleanly cut the sheet down to size in order to get the proper screen dimensions.
With this "paint a board" approach, you also may end up being limited in size in that your screen can only be as large as the largest piece of substrate material you can buy and safely transport to your residence. In the Manhattan apartments where we did the three installations detailed in this article, it would have been pretty difficult, if not impossible, to get a 4 foot by 8 foot piece of sheetrock into the apartment building and through the elevators and corridors. If you do choose this approach, keep in mind that 4 feet by 8 feet is the most commonly available dimension of sheetrock and wallboard. For a 16:9 screen shape, this supports a maximum screen diagonal of 98 inches, with 11 inches trimmed off of the length.
When working, as we did, with existing construction, painting directly on the walls, the real work was in the surface preparation. Be sure to repair any defects in the wall before you apply a single drop of paint. Follow the recommendations of your paint manufacturer and you'll be sure to get the best results from your project.
Final Thoughts
Overall, we highly recommend the combination of Screen Goo "Digital Grey" or "Digital Grey Lite" paint and Visual Reality's Flok framing tape - they represent an excellent blend of value and ease of application and, if applied properly, will make a significant improvement in your home theater viewing experience.
Special Thanks to: Adam Clem, Jim Jankay, Joe Lozito and Susan Doss for their participation in these projects.
Where to Buy Screen Goo Online:
Other Articles in this Series:
Related Articles:
Manufacturer's Contact Information:
Goo Systems
4 Harvey Street
Kingston ON - Canada
K7K 6A9
Toll free: (888) 541-0299
Phone: (613) 541-0299
Fax: (613) 541-1765
web: www.goosystems.com
Visual Reality
340 Hill Carter Parkway
Suite G
Ashland, VA 23005
Phone: (804) 364-3334
Fax: (804) 364-1333
web: www.goosystemsusa.com
BEHR Process Corporation
3400 W. Segerstrom Ave.
Santa Ana, CA 92704
Phone: 714-545-7101
Fax: 714-241-1002
Web: www.behr.com


