Gotta Get Myself Connected
Note: This article has been updated for 2012 to accomodate the latest technology and terms and how they may affect how you hook up your HDTV or 3D TV.
In Part I of this series, we covered the details on high definition formats and resolutions as well as the difference between HDTV and "HD Ready." Now we'll get into the nitty gritty of how to hook it all up so you get the best possible performance. We'll also cover 3D TV and its implications for getting everything connected.
If you are a cable or satellite customer, your first course of action when you bring home your new HDTV, HD-Ready TV, or 3D TV is to contact your provider to get a new High Definition cable box or satellite box. The installer will then come out and install the new box ensuring that it is connected properly. For satellite, you may need a new dish to go with the new box, but this cost is usually "absorbed" into the service fees, as long as you sign a service contract.
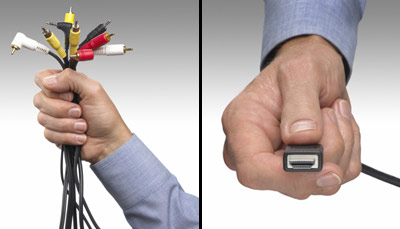
The installer may use cables called "component video cables" (3 cables in one with standard RCA plugs at the end, typically colored red, green and blue) to connect the new box to your TV. Component cables are fine for most purposes, and will carry high definition content at up to 1080i resolution. The installer will also most likely connect the cable or satellite box stereo audio output to your TV or receiver as well, so that you will get sound as well as pretty pictures.
But if you want to get the best possible audio/video connection (and the simplest), then you should upgrade from component video to an HDMI (High Definition Multimedia Interface) cable. An HDMI cable keeps the video and audio signal in the digital domain all the way from source to display, and this single thin cable carries both the picture and sound so it can simplify your connections considerably. If your television service provider offers any 1080p or 3D content, such as VOD movies, then you will need to use an HDMI cable between your set-top box and the TV in order to properly deliver that 3D signal to your TV.
The cables of preference to use between a high definition cable box, over-the-air set-top-box or satellite receiver and your HDTV are (from best to worst):
Many electronics superstores only carry expensive HDMI cables, selling for $100 or more, but you can pick up high quality cables that work equally well online for much less money ($15 or less for a 2-meter length). Look for HDMI-certified cables with high quality construction.
Here are a couple of sources for good inexpensive HDMI cables:
I'd Like My HDTV for Free Please
If you watch your TV for "free" using an over-the-air (OTA) antenna and your HDTV includes a built-in tuner, then you can simply plug your existing antenna cable into your new HDTV, go into the TV's set-up menu to "auto-tune" or "auto add" new channels, and your HDTV will do the rest, tuning in whatever analog and digital signals it can find.
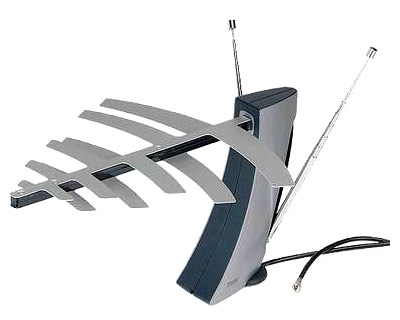
You should not need a fancy (and expensive) "HDTV antenna" in order to pull in HDTV signals broadcast over the air. HDTV and digital broadcasts are made over the UHF (ultra high frequency) and Upper VHF (Very High Frequency) bands, so any good UHF or UHF/VHF antenna should be able to tune in local HDTV channels, assuming you have a clear line of sight between yourself and the broadcast tower.
By "good UHF antenna" I don't mean rabbit ears. Rabbit ears actually only work on VHF signals (the old analog channels 2-13). UHF antennas typically have loops or ribbon-shaped elements. If you're in an apartment in or near a major city, then start with an inexpensive UHF or combined VHF/UHF indoor antenna like the Terk HDTVi, point it toward the broadcast towers and see if your set can tune in HDTV channels. If you can't lock into the HDTV channels, then you might need to look into a more expensive powered antenna, or a good quality antenna amplifier from a reputable company such as Motorola, Winegard or ChannelMaster.
If you're a home owner, or can get access to your roof to mount an outdoor antenna, then this will typically get you much better results than an indoor antenna. As a point of reference, we live in Astoria, NY, about 1.5 miles from the Empire State Building where virtually all of New York City's analog and digital TV broadcasts originate. We have an inexpensive (under $40 from Radio Shack) UHF/VHF mast-mount antenna on our roof and it is able to bring in all of the local digital and HDTV channels (ABC, NBC, PBS, CBS, Fox, etc.) even with the signal split 8 ways to reach all of our various source components and televisions.
Also, from a 5th floor Chelsea apartment on the West side of Manhattan, we were able to plug a simple UHF bow tie antenna (also from Radio Shack) into the back of a Vizio LCD HDTV. The antenna was left dangling behind the TV, along an interior wall with no special care made in placement. This also picked up all of the local New York City HDTV channels. Total cost? $3.99 plus an old 300-ohm to 75-ohm balun that we had lying around. Your mileage may vary, of course, but it's amazing what is out there for free.
If you're further out from the major broadcast areas, then you may need more expensive, more specialized antennas and amplification. To find out more about what antenna you need and where to point it, check out AntennaWeb.org, a public service web site, brought to you by the Consumer Electronics Association or try out TVFool.com. The local broadcaster information, pointers and recommendations can be invaluable in selecting the right antenna and gear for your specific area.
When HDTV is Not Really HDTV
OK, you've found the right antenna, or got the new HD cable box and tuned in all that great HDTV content. Some channels look awesome, and some channels look terrible. You may notice that channels like PBS-HD, HBO-HD, Discovery Channel HD and the major networks (in prime time) look phenomenal, with excellent detail and beautiful colors [note: if even your HD channels don't look so hot, then you may need to calibrate your display, more on that in Part III of this article].
But you may find that other channels, like the major networks (non-prime time), or specialty channels like SciFi Network or the History Channel just don't look as good. They may be grainy or pixelated, or they may just not use the entire screen with gray or black bars at the sides. This is because not all channels are broadcast in HD, and even channels that do broadcast in HD (such as the major networks) will frequently show many programs that are not shot in HD.
If a program or channel is not broadcasting in high definition, then typically you're going to be able to tell right away, because the shape of the program does not "fit" on your screen. Newer flat panel televisions are generally only available in a 16x9 widescreen shape, whereas older standard definition content is typically broadcast in a 4x3 roughly square shape. This "square peg in a rectangular hole" leaves bars at both sides of the image (grey or black bars called "pillarboxes").


What About The Third Dimension?
Since 2010, many HDTVs have come equipped with 3D capabilities. To take advantage of this feature, you'll want to get a 3D-capable source component such as a Blu-ray 3D player or 3D-capable cable or satellite set-top box. For 3D to work properly, you will need to connect the source component to the TV using a high speed HDMI cable. Note that even most inexpensive HDMI cables are capable of supporting 3D signals, so look for that "high speed" rating, buy a reputable brand of cable and don't spend more than you need to.
Throw Out All Your Old DVDs... or Not?
The only "problem" with getting larger, higher resolution televisions, and seeing what real high definition TV looks like, is that it spoils you. DVD movies which used to look so great (compared to standard TV or VHS tapes) now pale in comparison to HDTV. Does this mean you need to throw out your old DVDs and replace them with the newer Blu-Ray Disc players and software? Yes! And No... Let me explain.
Sure, Blu-ray Discs look and sound incredible - up to 6 times sharper than standard DVD. Once you've seen this new format in all its high definition glory on a large screen HDTV, it's hard to go back to "regular" DVDs. But you don't have to immediately go out and replace all your current DVDs with Blu-ray Discs. Blu-ray players also play standard CDs and DVDs, and many of them do a pretty good job upconverting stand def DVDs to high definition resolution. A good Blu-ray player will breathe new live into your DVD collection, and will allow you to upgrade on your own time line.
By all means, buy yourself a Blu-ray player, and start buying titles when they are on sale. But if a player upgrade isn't in the cards just yet, then at least make sure you connect your current DVD player to your TV properly.
Some DVD players offer HDMI outputs, and these are preferred, if available. If you can't find an HDMI output, most DVD players except the very cheapest entry-level models include component video outputs (three-cables-in-one, generally colored red, green and blue at the ends). These are the highest quality connections available on most DVD players and this connection allows you to pass a true widescreen 480p video signal to your new widescreen TV.
And speaking of widescreen, you'll also need to go into your DVD player's set-up menu and look for "initial set-up" or "video set-up." In these menus you'll find a selection for screen shape or screen format. Make sure "16:9" or "widescreen" is selected in this menu in your DVD player. Otherwise the DVD player will think your TV is the old square-ish 4:3 shape, and your widescreen DVDs will not display properly (they'll be "squeezed").
A Few Words about Audio
The speakers and amplifiers built into most televisions, even expensive flat panel TVs, generally don't even come close to keeping up with the picture quality. For this reason, we always recommend investing in a home theater receiver and a full set of surround speakers, or at least in a HTiB (Home Theater in a Box) system. You'll find reviews of these systems in our HTiB Reviews section. A discrete 5.1 or 7.1-channel system is best because then you can truly get sound coming from all around you, not just in front of you.
If you are opting for a surround sound system then you must use a digital connection between your DVD or Blu-ray player and receiver and also between your digital cable box (or the HDTV itself) and the receiver. Most HDTVs with built-in tuners include a coax or fiberoptic digital audio output that can carry the Dolby Digital 5.1-channel signal as broadcast directly to a home theater system. "Spartacus" in Surround? You bet! Most DVD and Blu-ray players also include digital audio outputs (fiber optic or coax) so be sure to make the digital connection here as well.
Another benefit to HDMI cables (mentioned earlier) is that they can pass the full discrete surround sound track to your home theater system as well, with that one thin cable. So if your home theater receiver has HDMI-switching and support for all the latest Blu-ray sound formats, then go HDMI for the simplest, highest quality video and audio connection. Also, if you are going 3D, then make sure your receiver supports 3D passthrough over the HDMI connections. Most receivers and many home theater systems built in 2010 and beyond support 3D passthrough.
And now that your audio is taken care of, it's time to concentrate on the picture. In Part III we'll discuss why your HDTV may have all the right connections and still look terrible, and what you can do about it.
Articles in This Series: