


Do you remember the first time you heard a home theater surround sound demo? I can still vividly recall standing in front of a blinking red button at Costco (then "The Price Club"); the button sat beneath a large TV and was labeled "Push For Demo." I pushed that button. Several times in fact. Pushing the button triggered the playback of a brief but grin-inducing sequence from Days of Thunder. The scene in question featured race car driver Cole Trickle (Tom Cruise) proving he means business - first by threatening to "drop the hammer" and then, immediately thereafter, by dropping said hammer. When that stock car roared around the racetrack, and the sound followed it, moving from the kiosk's front speakers to the two speakers suspended behind me, I was instantly hooked.
I've been waiting a long time for anything home theater-related to thrill me as much as did that blinking red button. And I'm thrilled to report that the wait is over. Dolby Atmos and DTS:X have completely transformed my home theater.
Regular BPBS readers know that we've written quite a bit about Dolby Atmos and DTS:X, the new, object-based, immersive audio formats from the surround sound pioneers at Dolby and DTS, respectively. Editor Chris Boylan and our team here have been tracking these formats closely, writing How-To articles, trade show coverage, and answering reader questions about hardware compatibility and software availability. Rachel Cericola has even put together an exhaustive Buyer's Guide on Dolby Atmos/DTS:X-capable audio/video receivers. Just do a site search on "Atmos" and you'll find all of that and more. Given our extensive coverage, I'm ashamed to admit it has taken me this long to get myself fully immersed. On more than one occasion, Chris has argued that adding ceiling speakers to my basement theater would be well worth the effort and that I'd be amazed with the results. As much as it pains me to admit it, Chris was 100% right. It was totally worth it. And I am indeed amazed.
[editor's note: I TOLD YOU SO!]

What's Involved?
If this is your first time hearing about Dolby Atmos and DTS:X, I highly recommend you read Chris and Rachel's article, How to Deploy a Dolby Atmos Home Theater; it provides a great overview of what's involved. As for hardware, here's the short version of what you'll need: assuming you're already running a 5.1 or 7.1 speaker system, you'll need 2-4 ceiling speakers (or reflective height modules, though I chose not to go that route) and an audio/video receiver (or preamp/processor) capable of decoding Dolby Atmos and DTS:X soundtracks. Depending on your desired speaker configuration and the receiver you purchase, you may also need an external amplifier to power a few speakers - but more on that in a minute. The good (or at least less expensive) news is that you shouldn't have to touch your existing speakers, TV, Blu-ray Disc player, or HDMI cables; they should all continue to work just fine after adding Dolby Atmos and DTS:X to the mix.
The hardest part of a Dolby Atmos/DTS:X upgrade is definitely running your ceiling wires and installing the ceiling speakers. If your ceiling makes ceiling speakers an impossibility, you can also opt for up-firing reflective speaker modules, designed to bounce your height channel sounds off your ceiling from your existing front and rear speaker locations. Learn more about these alternatives and more at Dolby's online Atmos product directory. In our collective experience, reflective speakers can work well, but discrete ceiling speakers work even better.
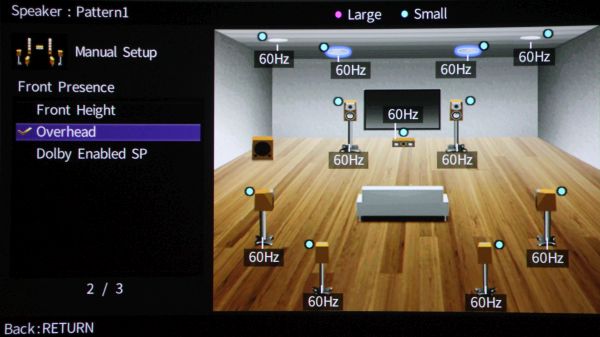
Once you commit to adding height channel speakers to your home theater, the first decision you'll need to make is whether you want to add two or four speakers. If your current system is 5.1 and you add two height channel speakers, Dolby calls the result a 5.1.2 system. Until recently, my basement theater was a 7.1 system. And while the addition of two ceiling speakers would surely have made a worthwhile improvement, I simply couldn't resist the opportunity to say "my theater goes to 11." Eleven speakers (plus a subwoofer) - or, as Dolby would call it, a 7.1.4 system - will mean the addition of four ceiling speakers. This means I'll need a plan for where to put the speakers. I'll need the speakers themselves. And I'll need a new receiver to manage them all.
This is my Dolby Atmos/DTS:X upgrade story. There are many others like it, but this one is mine.

Speaker Selection
Whenever you're adding speakers to an existing system, it's always a good idea to try to use speakers from the same manufacturer, preferably from the same model line using same size drivers. Cabinet design and construction methods, internal crossovers, and the drivers themselves all work together to give a speaker its tonal character and signature sound. Speakers from the same manufacturer, and particularly those from the same model line, tend to exhibit minimal variation in their tonal characteristics. This is important in a home theater system because you want a consistent quality of sound as objects (e.g. a circling helicopter) pan around the room - or fly directly overhead - transitioning from one speaker to the next.
In the case of my basement theater, I've long been enjoying the sound of seven matching in-walls from Nevada-based speaker maker Noble Fidelity. I reviewed them for another outlet back in 2008 and they've continued to impress since then. One of the great things about Noble Fidelity is that they include a complimentary design service, complete with scaled and dimensioned design drawings, with the purchase of their loudspeakers. And as I recently learned, they've also been fully trained by Dolby Laboratories in designing and laying out small-to-large scale Dolby Atmos systems. It should come as no surprise then that Noble Fidelity was my first phone call once I decided to embark on this project.
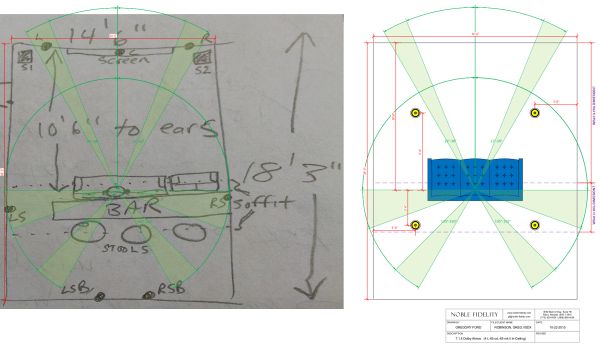
After telling the good folks at Noble Fidelity about my plan to add four ceiling speakers to my basement theater, I was asked to email them a few photos of my space along with a sketch indicating the key dimensions. The people at Noble Fidelity first confirmed that my existing 7.1 system was laid out in compliance with Dolby Labs' prescribed 7.1 geometry. Next I received from them a scaled diagram of my room indicating Noble's recommended installation locations for my four proposed ceiling speakers. As I learned in speaking with them, Noble Fidelity's Atmos system designs take into consideration the key issues of optimum boundary proximity and support in loudspeaker placement; this means they're careful to ensure that loudspeakers are not positioned too close or too far from reflective surfaces, either of which can be detrimental.
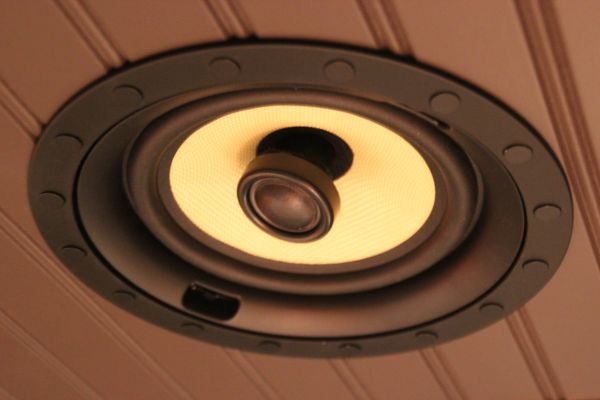
Once we had discussed my current speakers and identified the optimum locations to cut four new holes in my basement ceiling, we settled on Noble Fidelity's L-65 mk II as the ideal speakers to fill those holes. Compared with the seven LCRS in-walls I was already running, the L-65 mk II features similar-size mid drivers and identical tweeters. This means that, theoretically at least, they should blend nicely with my main speakers whenever overhead sound is called for. (Spoiler alert: they absolutely do!)
In. Stalled.
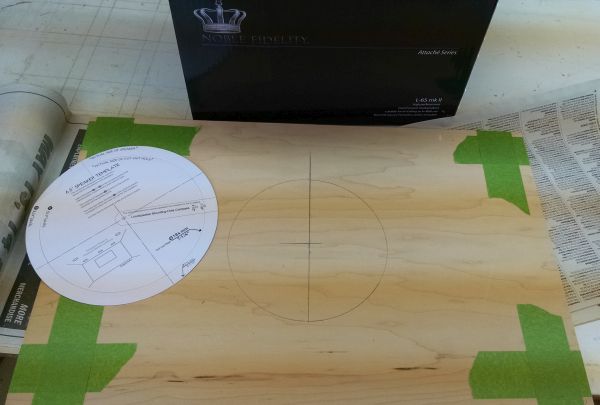
If you install four height channel speakers, the ideal locations for those speakers are going to be in the ceiling slightly in front of and slightly behind your primary seating area. This is what Dolby recommends and, in turn, this is what Noble Fidelity prescribed. Like most ceiling speakers, the Noble Fidelity L-65 mk II comes packaged with a handy cardboard template for tracing its ceiling cut-out hole. In my basement theater, the front height pair posed no problems. The ceiling in front of my sofa is drywall, and there were no unfortunately-located recessed lights to contend with. The rear height speakers were an entirely different story.
In my basement theater, there is a significant overhead beam and soffit enclosure running parallel to my sofa. This soffit occupies - and lowers - a good portion of the ceiling immediately behind my primary seating area. In other words, it's precisely where I want to put my rear height speakers. Installing the rear pair in the drywall ceiling behind the soffit would put the speakers a bit further back than I wanted, and I wasn't sure what the soffit would do to my ability to hear the speakers from the sofa - nothing good, most likely. Thankfully, all was not lost. After this dilemma stalled my project for a short while, a feasible plan eventually emerged, but it would mean some extra work.
I continue to thank Chuck Funk of Funk and Little - the woodworking masters who helped me frame and finish my theater - for his forethought and attention to detail when he built my ceiling soffit. In addition to integrating a convenient shelf for my concealed projector, Chuck convinced me that the entire underside of the soffit should be comprised of removable panels for easier access to wiring and plumbing in the future. And because Chuck integrated the recessed lighting into the panel grid's cross-pieces, the panels themselves are free of obstructions. They're also the perfect size to house an in-ceiling speaker.
Installing the rear height speakers in the soffit's panels proved trickier than it looked at first. The panels themselves are made of thin, lightweight MDF. And while the Noble Fidelity L-65 mk II isn't terribly heavy, the panel seemed incapable of adequately supporting its roughly 6-pound weight. To add some much-needed rigidity to the panels, I glued ¾" thick plywood to the backsides of the two panels in question. This was a process unto itself, during which I had to shave and chisel the plywood in several spots where interior obstructions were preventing the now-thicker panels from lying flat. It wasn't terrible though and in the end, my two panels were reinforced and I used Noble Fidelity's template to cut two holes in my new and improved "ceiling."
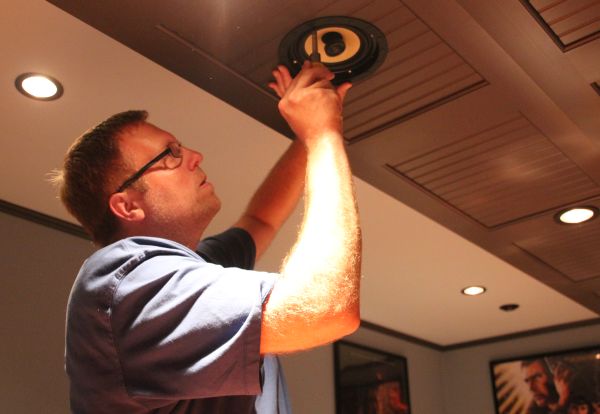
The worst part of any speaker retrofit is typically pulling the speaker wire from A to B. My life was made a bit easier here, again thanks to that soffit. Since the soffit is largely empty, it serves as an excellent wire chase and home run to my audio/video closet, which is adjacent to the soffit. Once I had my four ceiling holes cut, it was quick work to run my wires and prep the holes for speakers. Noble Fidelity ceiling speakers feature beefy, spring-loaded binding posts for wire connections and four fast and easy, swing-out clamps to secure the speaker to the ceiling.
One particularly nice touch Noble Fidelity added to their L-65 mk II speaker is giving you a choice of using round or square grilles; both styles are included in the box. The grilles are paintable - which I haven't gotten around to yet - and they can be easily swapped out thanks to a ring of cleverly-integrated magnets around the speaker's outer flange. This means you don't have to pry the grilles out with a paper clip, which can sometimes be a pain. The L-65 mk II's grilles being so easily removeable also comes in handy when you want to experiment with the midrange and high frequency acoustic compensation switches Noble Fildeility provides. These 3-position switches are largely "set it and forget it" adjustments - but you'll want to do some experimenting before you set them.

Eight Is Enough? Hardly.
As stated earlier, if you'd like to start taking advantage of Dolby Atmos and DTS:X, the two major hardware upgrades you'll need to make involve your speakers and your audio/video receiver (AVR). We just covered the addition of four ceiling speakers to my basement theater, so now it's time to talk about surround sound processing and amplification. However, before we get to the specific gear I installed, let's talk about why an upgrade is necessary and why the current hardware choices out there are somewhat frustrating.
An AVR essentially combines two key functions: audio processing/decoding and amplification. Whether you feed it the mono signal from an old Woody Allen VHS tape, the stereo signal from a David Bowie CD, the 5.1 Dolby Digital track from your Batman Returns DVD, the 7.1 DTS-HD Master Audio track from your Hellboy II Blu-ray, or the Dolby Atmos track on your Mad Max: Fury Road Blu-ray, the receiver's job is always the same: determine the type of soundtrack that's playing and route the multi-channel sounds to the appropriate speakers. In the case of 5.1 and 7.1 receivers, the receiver typically features five or seven internal amplifiers; this means you can connect five to seven speakers directly to the receiver and you're good to go. To achieve a 7.1.4 Dolby Atmos setup, things get a bit more complicated.
As stated earlier, a 7.1.4 system means eleven speakers plus a subwoofer. There are very few receivers on the market with eleven internal amplifiers. As a matter of fact, at the time of this writing, you can probably count them on one hand - and you might have a few spare fingers left. In many cases, manufacturers are selling receivers capable of Dolby Atmos and DTS:X, but they top out with a 7.1 or 5.1.2 configuration. As you may recall, 5.1.2 means seven speakers - and seven amplifiers. Mind you, there's absolutely nothing wrong with a 5.1.2 system. However, if you want to take full advantage of these next generation surround sound formats, 7.1.4 is where it's at.
To achieve a 7.1.4 system, you're going to want to look for a receiver that clearly offers support for eleven channels. That doesn't mean it has eleven internal amplifiers, but it should be capable of decoding a 7.1.4 soundtrack and routing sound to eleven discrete channels. Models that don't feature eleven internal amplifiers will typically feature pre-outs for the channels it can't directly power. And this is where things get a tad frustrating.
Although most Dolby Atmos/DTS:X receivers need an external amplifier to help drive eleven speakers, more often than not you don't get to choose which of the eleven speakers are driven by the receiver and which are powered by the external amplifier. Frankly, if an external amp has to be in the mix, I want to make the most of it. I'd rather have my AVR power my two surround-back channels and four ceiling channels and use a dedicated 5-channel amp to drive my five main channels. This would reduce the number of amplifiers needed in your receiver, but it would also require pre-outs for more than just your ceiling speakers and sophisticated channel mapping options in the software. And unfortunately, this just isn't available on most current receivers. If you want this kind of flexibility - or at least close to it - you're largely relegated to flagship model receivers or a separate pre-amp/processor.
I Need More Power, Captain!
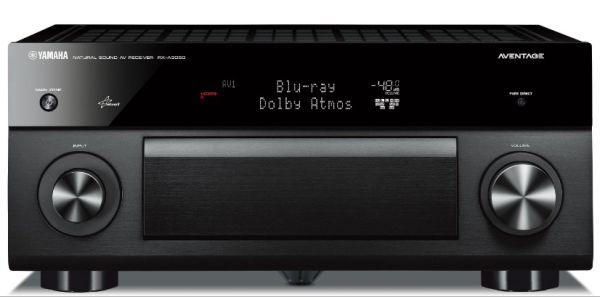
Although this is sure to change, there aren't many audio/video receivers on the market capable of decoding a Dolby Atmos/DTS:X soundtrack for an 11-channel, 7.1.4 system. The Yamaha Aventage RX-A3050 is one such monster, featuring 11-channel pre-outs, nine internal amplifiers, and fantastic performance. It ought to do nicely given my needs - but it's still going to need a little help.
As previously mentioned, there are very few AVRs with eleven internal amplifiers and the RX-A3050 is not among them. Yamaha's RX-A3050 features nine internal amplifiers and supports myriad different speaker configurations, including Zones 2/3 support and the possibility for bi-amping, if desired. If, like me, you're looking to drive eleven speakers in a single 7.1.4 system, the RX-A3050 gives you a few options over how to use its nine internal amplifiers and, by extension, where you'll need to add an external amp.
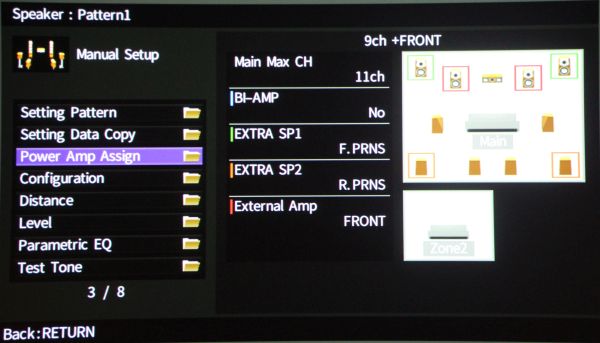
My choice with the RX-A3050 boiled down to whether I wanted to use the required external amplifier(s) to drive the rear height ("presence") channels, the front AND rear height/presence channels, or the front left and right mains. I opted for the latter, employing a dedicated stereo power amplifier to drive my front left and right main speakers. Audiophiles will argue that a dedicated amplifier is always preferable, so it stands to reason that if you have a high quality stereo amp available, you should give it your two most important channels. In a movie-focused home theater like mine, the center channel is arguably the most important channel, with the front left and right tied for a close second. If music is your thing, the front left and right are definitely your VIP speakers. Although I opted to use an external amp for the front left and right speakers, Yamaha makes it easy enough to change those assignments using an intuitive graphical user interface.
Push For Demo
Once I configured everything on the Yamaha, I was eager to see, err, hear what my efforts had yielded. Luckily, there are quite a few Blu-ray Discs out now that feature Dolby Atmos or DTS:X, the former being more numerous at the time of this writing. The first disc I reached for was Warner's Gravity. Gravity is a remarkable film and I can remember just how visceral my experience was when I first saw it at the local multiplex. Firing up my Diamond Luxe Blu-ray edition (the only release featuring a Dolby Atmos track), my jaw was immediately on the floor.
The first scene in Gravity, during which a routine space walk becomes a horrifying nightmare, is an armrest-gripping assault on the senses. But even before disaster strikes, the magic of Dolby Atmos is immediately evident. Hearing the radio voices of Ed Harris, George Clooney, and Sandra Bullock subtly moving from one channel to the next - first they're in front and then they're above and then they're behind AND above - all while Clooney slowly orbits the shuttle in his jet pack? I was sold before the first piece of debris arrived. Of course, then the debris did arrive and I'm pretty sure I forgot to breathe for the next five minutes. In a word, incredible. Simply incredible.

It's worth noting that when I first received the Yamaha RX-A3050, DTS:X soundtracks were registering as DTS:HD and I was unable to detect height channel sound. Like Dolby Atmos and TrueHD, the height information in a DTS:X mix is layered on top of the core DTS-HD Master Audio soundtrack. This allows for backward compatibility with receivers lacking Atmos/DTS:X support. After DTS:X failed to decode on multiple discs, I paid a quick visit to the Yamaha website where I learned that DTS:X support was actually added to the RX-A3050 via a firmware update. In my eagerness to start listening to these new, immersive soundtracks, I had skipped the step of giving the Yamaha an internet connection. Once I made the connection, software version 1.77 was quickly and easily downloaded and DTS:X was in the house. The internet can be a wonderful thing.
I'll have more to say on the Yamaha receiver in an upcoming review. The RX-A3050 is one "prime piece of thrust" as Kowalski might say, but during the course of writing this article, Yamaha introduced a replacement model, the RX-A3060. Watch for a review of this new model some time soon.
One thing to remember is that when it comes to receivers and amplifiers, you can - and probably will - upgrade down the road. I'm sure I'm not the only one with a few old receivers, some of which have been repurposed to places like the game room, the bedroom, or the backyard for outdoor movie night. Granted, when you're dealing with flagship receivers that cost $1,000-$2,000 (or more), you're not going to want to upgrade too often. My point is simply that your speakers and wiring are a much longer-term decision, whereas you're apt to want to upgrade your AVR the next time a new technology as impressive as Dolby Atmos and DTS:X comes along.
On a final note regarding the L-65 mk II, suffice to say that is one sweet little ceiling speaker. Once I moved beyond the initial wow stage of hearing sounds directly over my head, it quickly became evident that the L-65 mk II exhibits a wonderful quality of sound and tremendous range, from a robust midrange to crisp, airy highs. They also blend beautifully with my LCRS in-walls. Make no mistake, these are no mere effects speakers; I could easily see myself using these as main channel speakers if I wasn't already thrilled with my Noble Fidelity in-walls.
Fully Immersed
As with 3D, it's not the overt, stick-in-the-eye stuff that impressed me the most with Dolby Atmos and DTS:X. It's the subtle stuff. A low-flying helicopter hovering directly overhead is certainly cool, don't get me wrong. But hearing those astronaut voices shifting seamlessly from one overhead speaker in front of me to a different overhead speaker behind me? Or in Mission Impossible: Rogue Nation, hearing Benji's voice reverberate around the underground stone chamber and feeling suddenly like I'm in a much larger space than my basement theater? That's the power of these new sound formats. And it is truly awesome.
Now that I'm completely addicted to Dolby Atmos and DTS:X, I've asked Chris if I can start a new column focusing exclusively on these killer new soundtracks. I'll attempt to cover a handful of titles in each one and the first installment is coming soon. [UPDATE: Fully Immersed #1 is now online!]
Like the move to high definition and Blu-ray Disc, I'm already getting disappointed when I see a new release that doesn't feature either Dolby Atmos or DTS:X. Get yourself set up and I guarantee you'll start doing the same thing.
Now I just need to wait for Days of Thunder to get an Atmos soundtrack...
More Information:


