


Teach Your Old Home Theater Receiver New Lossless Surround Sound Tricks
Although Blu-ray Disc's 1080p full high definition picture gets all the attention, the surround sound audio formats available in Blu-ray are equally as impressive as the video. Up to 7.1 channels of pure lossless surround sound at 96 KHz and 24 bit precision? It absolutely boggles the mind! And it's the audio set-up options that are easily the hardest part of going Blu.
If you have a newer receiver that processes audio over HDMI, then the set up for the lossless audio formats (Dolby TrueHD and DTS-HD Master Audio) is mostly plug-and-play. Sure, you'll have to figure out what "Secondary Audio" is and you may have to learn the difference between "bitstream" and "PCM" but you won't have to change any of those hard-won settings on your A/V receiver. But, if you have an older receiver that lacks HDMI audio support (but does have a multi-channel 5.1 or 7.1 analog input), then you have your work cut out for you in order to get the best possible sound quality from your fancy new Blu-ray player.
All Digital Inputs Are Not Created Equal
HDMI (High Definition Multimedia Interface) is currently the only digital interface that can properly transmit the newest surround sound formats. Dolby TrueHD, Dolby Digital Plus, DTS-HD High Resolution, DTS-HD Master Audio - even multi-channel PCM - cannot be sent over traditional optical or coax S/PDIF digital audio connections - these connections simple won't fly when it comes to meeting the necessary bandwidth and copy protection requirements. If you try to do it, you'll get a "lossy" Dolby Digital or DTS soundtrack instead. This can still sound very good (in fact, Blu-ray supports higher bandwidth versions of regular Dolby Digital and DTS than DVD ever did) but it won't take full advantage of the lossless soundtracks which are bit perfect copies of the original studio masters.
But don't despair! If you don't have HDMI audio support on your A/V receiver or preamp/processor, but you do have a 5.1-channel or 7.1-channel analog audio input on said device, and you still want to take advantage of the latest high bandwidth and lossless audio formats available on Blu-ray, here's what you need to do:
Sounds simple, right? It can be. But it's easy to get lost along the way, and it helps to understand what's happening so you know what exactly is entailed in the set-up process.
1.) Pick Your Poison
Let's start with the player and the cables. For years, people have been setting up their DVD players to bitstream Dolby Digital and DTS tracks to a receiver for decoding. The player was just a transport and the receiver did all of the heavy lifting - converting the digital signal to multiple analog channels and amplifying these channels for playback through a surround sound speaker system. But, with multi-channel analog audio transmission, you need a Blu-ray player that can do the decoding itself. In particular, it must be able to decode Dolby TrueHD and DTS-HD Master Audio to multi-channel analog signals (not just to PCM). The player also needs multi-channel analog outputs - one output jack for each speaker channel.
Some players that are currently on the market that support multi-channel analog outputs, decoding all of the next generation formats to analog include the Panasonic DMP-BD55, Sony BDP-S550, and yes, I know this is not a comprehensive list, but these are two of the most popular current generation players. Players from Samsung, Denon and Pioneer offer multi-channel outputs but do not yet support DTS-HD Master Audio decoding as of the writing of this article (it's promised in a future firmware upgrade).

The right player will decode all digital soundtracks (Dolby Digital, Dolby Digital Plus, Dolby True-HD, DTS, DTS-HD HR and DTS-HD MA) producing multi-channel PCM sound, and then it will immediately convert that multi-channel digital PCM sound to analog. The player then sends the multiple analog audio outputs to your receiver over multi-channel analog audio cables.
2.) Choose Your Cables
You'll need to run a separate analog audio cable from each speaker output on the player to the matching input on your receiver -- six cables for a 5.1 system, eight cables for 7.1. You can buy expensive multi-channel cable bundles if you like, all nicely color-coded. Or you can use the familiar red and white audio cables you can find at your local Home Depot or Radio Shack. For better quality, try well-shielded higher gauge cables as these will reduce the possibility of external interference to the audio signal as it travels from your player all the way to your receiver.
Your receiver will control the volume of the multi-channel analog inputs, but (in most cases) nothing else. No bass management, no individual level adjustment or delay time adjustments. The external analog inputs generally bypass these controls as they are usually performed in the digital domain. This is why you must adjust the channel levels, delay times and bass management options in the player, which brings us to the next step.
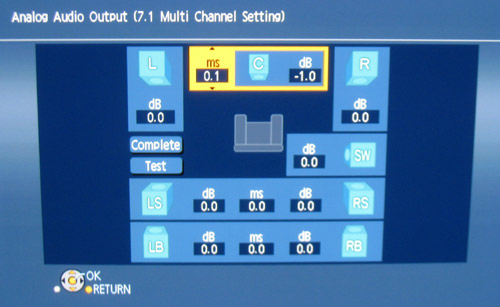
3.) Your Speakers: How Many, How Big, and How Far?
Now you'll need to tell your player a little bit about your speakers. This is the same kind of configuration you probably did when you first installed your receiver - entering the number of speakers, whether they are large or small, as well as the distance they are from the primary listening position, and adjusting the overall levels so there is an even blend of sound across all of the main speaker channels. Why do you need to do these configurations again in the player? Well, bass management and other adjustments generally have to be done while the audio is in a digital format. The player will be converting the digital audio to analog before it gets to your receiver. So, the speaker set-ups in your AVR won't come into play.1
Using the player's analog outputs, the player has to do all of the digital processing for bass management, level adjustment and time delays. Most players only have only a few settings you can adjust. You identify your speaker arrangement -- 5.1 or 7.1 or whatever configuration you have -- and whether your speakers are large or small. Players usually have a fixed bass "crossover" that you can't change. The crossover is the frequency where a speaker system "crosses over" from bass reproduction (low frequencies) to midrange and treble (mid to high frequencies). On most players this is at or around 100 Hz. If you have small satellite or bookshelf speakers which cannot reproduce very low bass, then you may want to define these as "small" in your player, so the player will re-route the low bass information (the information below the crossover point) to the subwoofer channel.
Some players allow you to set delays if your speakers are not all the same distance from your listening position. This is helpful if your rear speakers are very close to the primary listening position, while the front speakers are much further away. By adjusting the delay times, or distances, you can create an ideal virtual surround soundstage where all of the channels are the same perceived distance from your "sweet spot" -- your favorite viewing/listening position. Some players do not offer this delay adjustment.
And, finally, you need to adjust the overall levels of each of the respective channels. If you have 5 or 7 identical speakers around your room (plus the subwoofer) then you may not need to adjust the levels very much, if at all. But it's always a good idea to confirm correct level setting using a pink noise test tone (either on a test disc or with a test tone generator built into the player). For best results, measure these using an SPL (Sound Pressure Level) meter. But if you don't own one of these, you can set the levels by ear.
So: speaker size, speaker levels, number of channels and delay - that's about it for your configuration choices with most players.
4.) Scotty, We Need More Bass!
The final configuration step in getting good sound from a multi-channel analog configuration is getting the subwoofer level right. This is often the toughest part of setting up analog audio. The LFE (Low Frequency Effect) channel is designed to play back 10db higher than the other channels, for maximum impact. But, that extra 10db may clip during transmission to your receiver, causing audible distortion. So, the LFE channel is generally mixed at the same level as the other channels in the soundtrack, with the understanding that it will be boosted 10db (decibels) by the receiver. With digital transmission of multi-channel audio, the software adds the boost to the signal automatically. With analog, the user (that's you) needs to apply the boost to the signal, but it can't be done in the player (again, due to the risk of overloading the analog inputs of the receiver) -- it must be done in the receiver.
But wait, there's more! One more complication, that is. When using bass management in the player (setting any of the speakers to "small" in the previous step), the subwoofer channel is dropped another 5db to "make room" for the redirected bass information from the other channels. This means the subwoofer level actually needs to be boosted by about 15db in the receiver in order to get it to the "correct" output levels.

Many (if not most) receivers and preamp/processors have a special setting to boost the subwoofer for the multi-channel analog inputs. This may be called "subwoofer sensitivity" or "subwoofer level" (and it's different from the level controls for the digital inputs). Some receivers even apply this boost by default. But, other processors don't make this level adjustment so easy. If your receiver doesn't have a way for you do the required LFE boost and you think the bass sounds a little weak, you still have a couple of options.
You can simply turn up the sub. Most powered subwoofers have a level or volume knob on the back or bottom which raises the overall output level of the subwoofer. Of course, that will give your digital sources too much bass. So, if you take this approach, you will need to recalibrate your receiver by reducing the sub output for the digital inputs. If you ran an auto-calibration routine such as Audyssey or MCACC, then you'll need to run it again with the subwoofer at its new, higher volume so that proper balance is restored to your digital sources.
The other choice is lowering the output of the non-LFE channels in the player, which has the same effect as boosting the sub. Of course, now your overall volume will end up too low and you will need to crank it up in your receiver. While this approach will get the proper bass balance, it raises the noise floor, which may not be the ideal solution.
5.) Flip The Switch!
The final detail is selecting the external inputs on your receiver during playback. The external input is normally treated a little differently from the other inputs on your receiver, and it may not be one that can be pre-defined as an "activity" or macro in a universal remote, or permanently assigned to a specific named input. In some cases, the external input is selected by a button on the receiver itself (or sometimes on the remote) that tells your processor to find the audio on the analog inputs instead of the digital or stereo analog input normally assigned to that named input. In other receivers, the multi-channel analog input can be assigned to a named input in the set-up menus.
Enjoy That Pure, Pure Lossless Multi-Channel Audio!
For some reason, many people think analog audio is somehow inferior to digital. But, all audio is analog in the end. Analog is what drives our speakers and analog is the sound our ears can hear. Those digital 1s and 0s are simply the storage and transmission media for the underlying analog sound that occurs in nature. The digital to analog conversion usually happens in the receiver. But, it can be done just as easily in the player. It doesn't really matter where the conversion takes place as long as it takes place properly and the resulting multi-channel analog sound makes it to the speakers with as little distortion as possible along the way.
Knowing Where the Magic Happens
Actually, that last statement -- "it doesn't really matter where the conversion takes place" -- is a bit oversimplified. There are two factors to consider if you have a choice about using digital (HDMI) or analog for lossless surround sound. The first concerns digital signal processing. Receivers generally have better tools than players for bass management and EQ (equalization). In fact, you won't find any EQ settings on players until you get into the high-priced models such as the Denon DVD-3800BDCI. So, you'll likely get better audio when using the signal processing in your receiver, especially if you have a room that needs lots of help to sound right. This means that if you can use HDMI to carry the audio from the player to the receiver, then do so.
The second factor is the quality of the DACs (digital to analog converters) in the various components. The DACs produce analog sound waves based on the digital data. Better DACs produce better sound. As with signal processing, receivers usually have better DACs than players (particularly high-end receivers and preamp/processors). But that's not always the case. All other things being equal, you want to do the digital-analog conversion in the component with the better-sounding DACs.
My current Blu-ray player is a Panasonic DMP-BD55 player paired with a Denon AVR-3805 receiver. Since my receiver does not have any HDMI connections, I like to use 5.1 analog connections when listening to Blu-ray and a coax digital connection for watching/listening to regular DVDs. That set-up allows me to enjoy the new lossless audio surround sound over analog for Blu-ray Discs, while using my receiver's built-in signal processing and DACs for DVD playback. I have two activities programmed on my remote along with a button for each activity allowing me to switch easily between the digital and analog inputs. The best of both worlds (and it didn't require me to throw out my old receiver, which is otherwise quite capable).
The End Justifies the Means
Setting up analog sound on a Blu-ray Disc player can be a lot more work than digital. But, if you want lossless audio without the expense of buying a new receiver or processor that has HDMI audio support, it's definitely worth the effort.
More Information:
Footnote 1: A few high-end receivers and preamp/processors do allow more control over the multi-channel analog inputs, usually by converting the incoming analog signals to digital. If your receiver or pre/pro is such a beast, then set all speakers to large in your player and set all speaker levels and delays to their default values. You'll then set these parameters in the receiver


