I've been a DISH Network customer for years now. I love TV and all things associated with TV. Not to sound like a bad commercial, but DISH does offer lots of channels at a reasonable price, as well as some decent HD. What's not to like? Well, I am spoiled -- at least when it comes to technology. I always want more.
It just so happens that my editor was very willing to feed that need. He asked if I was interested in adding more channels and recording options into my current DISH DVR. Let's see... more channels for zero extra dollars per month. Did I have to think longer than two seconds about this assignment? Needless to say, I jumped at the chance.
Go Local
If you're a DISH or DIRECTV customer, you're probably already getting your local network channels, hopefully in high def, on your existing receiver or DVR. These channels are delivered via satellite using something called "spot beaming." This technique assures that customers only receive local broadcasts for their specific geographic location. For the most part, this works fine, but there are some drawbacks. The quality of these re-broadcast local channels can suffer as they undergo compression to fit within the satellite signal's bandwidth. Also, when station owners renegotiate their terms with your satellite provider (as is currently happening with LIN Media and DISH), you may be subject to blackouts in your local service. What's a poor TV addict to do?
Of course, depending on your location, you may be able to use an indoor antenna. Before you start a project like this, you're going to want to consult a website like TVFool.com or AntennaWeb.org. Each site takes your address and provides a peek at the stations broadcasting in and around your area, as well as exactly from where. That location is just as important as the number of stations you can expect to receive. Indoors or outdoors, if you aren't pointing the antenna in the proper direction, you're probably not going to get much of anything.
Gathering Materials
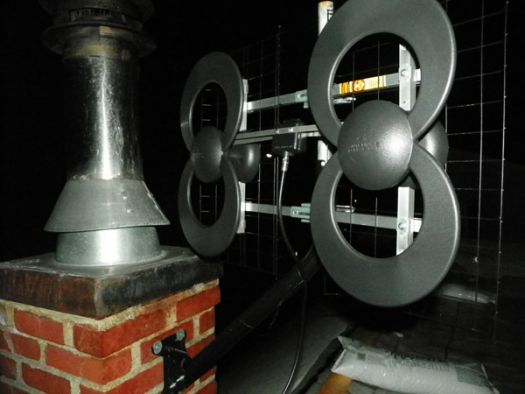
Some antennas actually come with all of the mounting hardware you will need for the installation, but many do not. Also, a few extras never hurt. Since I was mounting the antenna on my rooftop, I opted for a J-mount antenna mast, which hoisted the antenna up an additional 30 inches.
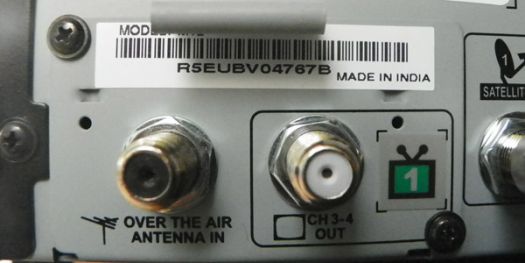
Also, I opted to run a direct line from the antenna to my ViP722k box. For me, this was the best solution as I didn't want the antenna near my existing satellite dishes, which are on the side of my house. My best OTA reception seemed to be coming from the roof, so I ran a line from there into the side of my house, near where my satellite cable enters. Of course, this requires a bit of cable splicing and termination, as well as drilling into the side of the house. There's nothing like the feeling of drilling a big hole in your house (my husband helped with that part and you should have seen the grin on his face). Of course, if you're renting, we'd recommend getting your landlord's permission first. Another option is to use a flat coax coupler. It's thin enough to squeeze over the top or bottom of a window while the window itself remains closed.
If you aren't comfortable with either of those things, you can opt for a diplexer or even a triplexer. These devices combine the signals from a satellite antenna and a cable or OTA antenna feed so you can piggyback the new signal over your existing wires. That way, you won't have to run lengthy parallel cable runs or drill into anything. You will need one of these at the outdoor satellite dish to combine the signals as well as another at the receiver end (inside the house) to split the signals back out.
One other option that I added into the mix was a distribution amplifier. This isn't always a necessity, but I found that it did improve my reception. According to a bit of web research, I found out that the 722k's tuner module can be sensitive to multi-path distortion, so the amp gives it a nice boost. If you're in areas of fringe reception, you might also consider a preamplifier which normally mounts outside, near the antenna, but in my case, this was unnecessary.
It's Installed. Now What?
After the antenna is installed and the mess has been cleaned up (yes, there's some), the real fun begins. This is where you'll see the fruits of your labor.
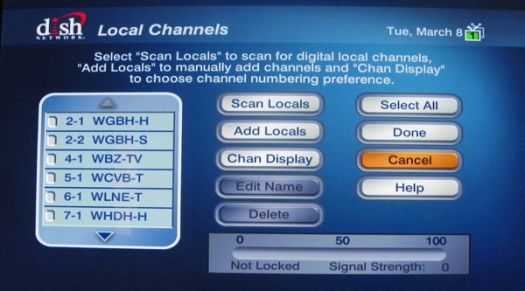
First, you need to enable your your local channels on your receiver, which isn't half as difficult as installing the antenna. On the ViP722k, I clicked the DVR's menu button, went into System Setup (option 6), and then Local Channels (option 9). From there, choose "Scan Locals." It just takes a minute for the receiver to scan through local digital channels. At the end, click OK.
This takes you back the Local Channel menu screen (see above photo), where you can choose to only add specific channels or just add all of the digital channels found during the scanning process. Don't want to add the same channels that you receive through satellite? It's easy to clip them out. However, I found at least a handful of digital channels broadcasting in HD, that were not being offered by my DISH Network service.
Now, not only does the OTA module offer more channel options, but it also offers more DVR options. On its own, my 722k box is a dual tuner set-top box. It currently feeds DISH Network signals and a shared DVR to my living room and bedroom TVs. The OTA module adds in two additional OTA tuners, which means two additional recording options as well. Drooling yet?
In the DVR's single output mode (cutting off the bedroom TV - sorry, honey!), I was able to record two OTA channels and two satellite channels at the same time. Just an FYI: Assuming you have the need to record four shows at once, you won't be able to watch a fifth. That's just downright greedy!
When I switched back to dual output mode, I got similar results. I could record one OTA channel on TV1 while watching a separate satellite channel or vice versa, all while TV2 was independent, and able to do the same thing. So, in other words, each TV could record and/or watch one satellite channel and one OTA channel at the same time. This time, things were a bit more tricky than in single TV mode.
After some trial and (a lot of) error, I found that the easiest way to set my recordings was through the DVR's guide menu. Also, once you set that recording and want to change channels, it's best to just punch in the channel number directly or access it from the guide, versus flipping channels. Flipping always gave me a message asking if I wanted to stop the recording because the DVR thought I might want to change to a satellite channel (while the satellite tuner was in use) or to an OTA channel (while the OTA tuner was in use).
Adding the antenna, the OTA tuner and the new channels may seem frustrating at first, but it can be a fun little family project and the results are so worth the effort. There is a slight start-up fee for the antenna and possibly for the OTA tuner if it is not already built into your DVR or satellite receiver, but the additional channels will more than make up for that cost. Also the assurance that you will still get your local channels even when the TV providers are arguing with each other provides some nice peace of mind. And the bottom line is that it's fun getting something for free for a change!