


Thanks to a wide range of affordable options, mounting a flat screen TV on the wall - even with a little tilt thrown in for good measure - is no problem for those on a budget. Try putting it in a corner, though, and the mere thought of plunking down big bucks for a fancy swiveling, articulating, reticulating, gesticulating (what's that word again?) wall-mount swiftly conjures up visions of personal bankruptcy, not just for the mount itself but also the high-priced specialty contractor to install it.
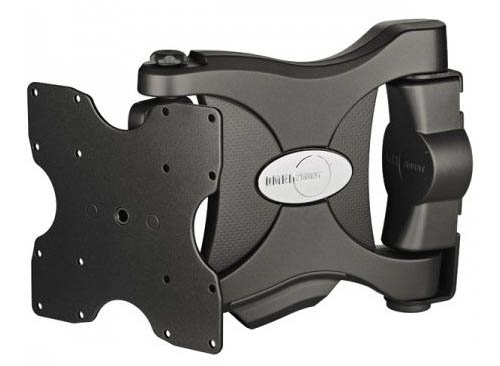
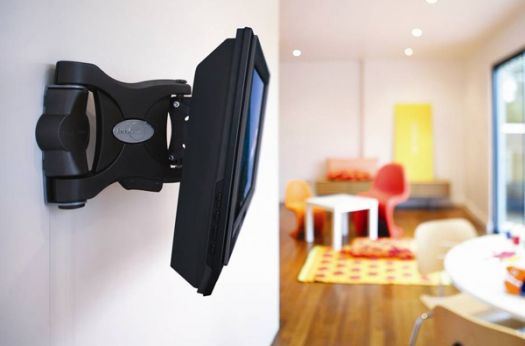
Fortunately, it's no longer necessary to bust junior's piggy bank to pay for that coveted corner mount. OmniMount's 4N1-M WorldMount Series flat panel wall mount is a - yes - articulating mount (i.e. it has a hinge or pivot connection enabling a wide range of motion), and it doesn't take a rocket scientist, or even a person with an advanced degree in carpentry, to put it on the wall. The 4N1-M allows you to mount your TV in a corner and still have the ability to turn it in different directions to face your current viewing angle. And the 4N1-M offers this maneuverability and ease of installation at a fairly affordable price (the MSRP is $149.95, but we found it on Amazon for much less).
Is it perfect? No. The 4N1-M's mount arm is sheathed in a somewhat bulky-looking plastic housing that creaks a bit when the mount arm is moved, and it comes with overly long (at least for our purposes) lag bolts. But these are relatively minor faults which don't affect the 4N1-M's essential characteristic: it is an extremely good value. But I'm getting ahead of myself...
If You Mount It, They Will Come...
From its beginnings as a manufacturer of audio mounts, Phoenix-based OmniMount has broadened its offerings over the years to encompass mounting solutions that cover the entire spectrum of home theater equipment. The company's website (www.OmniMount.com) is a good place to start, offering visitors a comprehensive, easily navigable overview of their entire product line.
Prominent on the website's home page is the OmniMount Finder, which allows consumers to instantly pinpoint mounts compatible with their specific make and model TV. Had we, the "professionals" at Big Picture Big Sound, had the foresight to check this handy tool before attempting to install the 4N1-M on a VIZIO VP-322 plasma, we would have quickly discovered that we needed an optional adapter.
The 4N1-M mount is designed for the VESA standard mounting holes that you find on most smaller to medium-sized flat panel TVs, specifically the 100x100 mm or 200x200 mm spacing. Meanwhile, the VIZIO VP322's mounting holes are spaced at the VESA standard 200x400 mm, a mounting width found more commonly on larger sets. The website recommends the V24 plate adapter, but the VS24 strip adapter - which we ultimately used - retails $10-$20 cheaper and works just as well. Both allow a 200x200 mount to fit 200x400 mounting holes.
As it was, we spent an exasperating half hour wondering why the 4N1-M's mounting plate wouldn't fit our TV before realizing - d'oh! - that we needed the adapter (it actually says as much on the back of the package, albeit in very small type). Anybody considering the 4N1-M or any other OmniMount product for that matter would be well advised to consult the website first to assess compatibility with their specific set.
Installation
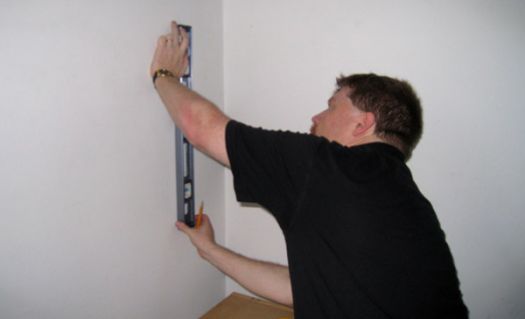
Installing the 4N1-M is a straightforward, four-step process: (1) attach the mount and (if required) optional mounting plate to the back of the TV; (2) choose location and height for the bracket on the wall, marking the hole placement using a level and pencil; (3) drill mounting holes and attach the bracket to the wall; and (4) fit the TV/mount assembly onto the mounting bracket and tighten an adjustment screw. Note that for step 2, it is preferable to mount the bracket to a stud inside the wall for maximum stability. The only tools required are a ruler, screwdriver, stud finder, level, pencil, drill, and a socket wrench.
Once we had our $!##!@!! VS24 strip adapter, attaching the mount to the TV was easy, thanks to the broad selection of mounting screws supplied by OmniMount, intended to fit most TV models. Unfortunately, with the thick lag bolts used to securely attach the mounting bracket to the studs in our wall, there is no such selection - OmniMount only supplies a single pair of extremely long 88 mm (3-3/8") bolts. The instructions recommend drilling 3-1/2" holes to accommodate them; our hole bottomed out on exterior masonry at about 2-1/2 inches. Had we used those mongo lag bolts, we would have ended up with a good inch of bolt to spare, and that might have annoyed our landlady as she looked up while walking to church to see two shiny bolts protruding from the external wall.
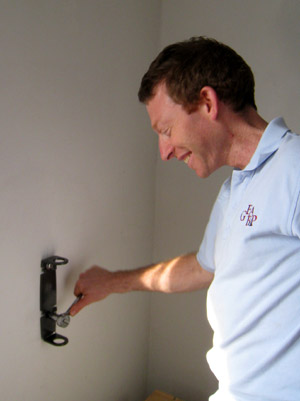
With the mounting bracket securely in place, completing step four seemed a simple matter of fitting the mount arm into the holes on the mounting bracket, then hand tightening an adjustment screw on the bracket's lower end. We did that, only to have the mount arm screech, pop and creak like a braking subway train as soon as we moved it. Figuring we may not have seated the arm properly, we pulled it off and tried again. This time it dropped nicely into place, and -- Shazam! -- the creaking and popping disappeared -- well, for the most part (see below). Once installed, the mount tilts, swivels and rotates with ease; the adjustments carried out by loosening and tightening strategically placed, easily accessible Allen screws and/or conventional nuts.
In terms of design, OmniMount's higher-priced -- ahem -- articulating mounts embody a modern, minimalist aesthetic, their metallic arms narrow and unadorned. The 4N1-M's metal frame, by contrast, is covered by a plastic housing which gives the mount a slightly bulkier appearance in comparison to its cousins. This housing boasts several handy features -- notably an underside compartment for facilitating cable management and a built-in Allen wrench holder. It also tends to creak ever so slightly when the mount arm is moved back and forth, probably due to friction between the housing and the metal arm underneath. Happily, this is no reflection upon the 4N1-M's solidity. When properly installed, the 4N1-M is not only rock-solid, but also conveniently vanishes behind the body of the TV, rendering any quibbles as to its aesthetic drawbacks essentially moot.
Pimp My Mount
Okay, so the 4N1-M isn't quite the Porsche of articulating mounts, but nor is it priced as such. Nevertheless, distinct measures can be taken to improve its overall appearance, like deploying a decent cable management system. As we've seen, the 4N1-M makes an initial stab at addressing this problem via a convenient cable routing attachment on the underside of its plastic housing. Unfortunately, this imposition of order only lasts about two inches, then the cables reemerge at the back of the mount and wire clutter again reigns supreme. The best way to hide cables is to really hide them - tucking the cables neatly away inside the wall. But did I mention the landlady? Getting her to agree to let us put two screws into the wall to hold the TV was tricky enough. Carving out a large enough hole in the wall to run cables through it might have sent her to the hospital.
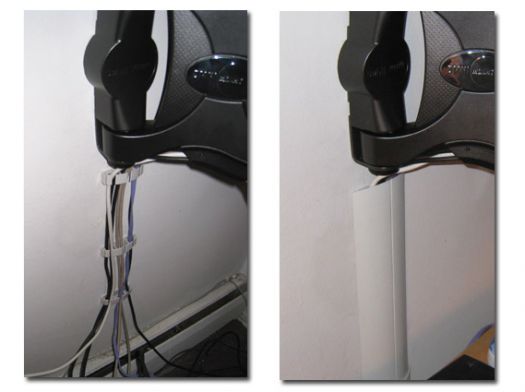
Enter OmniMount's CMK (cable management kit). Essentially consisting of a several cable clips attached to the wall at regular intervals, then topped by a series of plastic covers, this easy-to-install optional cable management system obviates the need to run cable through gigantic holes in the wall. As with the 4N1-M, the CMK includes an illustrated installation guide intended to be simple enough for even a DIY-challenged octogenarian to understand. And as it happened, we two paunchy, slightly inebriated forty-somethings couldn't make head nor tail out of it.
Incomprehensible directions notwithstanding, the installation is actually quite simple: (1) choose a cable pathway on the wall; (2) attach the clips to the wall using either adhesive strips or screws (both supplied); (3) route the cables through the clips; and finally (4) snap on the cable covers. Presto - bye bye wires! The entire install took 15 minutes tops, and the results were plain to see - except for the wires, that is. In short, the CMK makes for a practical and aesthetically pleasing complement to the 4N1-M when going in-wall simply isn't an option.

Turn-Ons
Turn-Offs
Final Thoughts
The OmniMount 4N1-M is an excellent solution for the budget-conscious individual looking to purchase an advanced articulating flat panel mount. It is solid, easy to install, and highly maneuverable. It may not be the sleekest looking mount around, but it does what it sets out to do, and that's what's important.
Where to Buy:
Specifications from the Manufacturer:
Manufacturer's Contact Information:
OmniMount
8201 South 48th Street
Phoenix, AZ 85044
1-800-MOUNT-IT (800-668-6848)
On the Web: www.OmniMount.com
Where to Buy:
| Overall | |
|---|---|
| Value | |
| Performance | |
| Features/Ergonomics |


